Showing posts with label Android Tutorial. Show all posts

Bring Up Menu Button on Android Device with Physical Button Running AOSP Based ROM

It's all begin when i changed my Samsung Galaxy V phone ROM to CyanogenMod 11 (Kitkat AOSP based ROM), I then found some issue finding a menu button in some application that gone missing. I got these "missing menu button" on some application like Firefox, Titanium Backup, Catlog, ePSXe emulator, etc.

What is menu button? Menu button is a three dot / three line icon (or using "Menu" text instead) usually placed on top of application user interface. It is used to access the main Menu preferences.

titanium backup menu button appears
Menu button appears

titanium backup menu button missing
Menu button gone

On ePSXe emulator, the menu is used to access the main options like cheats, graphic setting, and other quick preferences. The menu is can be accessed by pressing "back" key when I was using stock Touchwiz ROM of my Samsung Galaxy V phone. But after I changed my phone ROM to CyanogenMod 11 suddenly the "back" key changed to exit menu on the ePSXe emulator application. This also then became an issue when I was using some application like Firefox Browser, Titanium Backup, Catlog app, I can't found the menu button in the app!

What caused the menu button missing on applications on Android Kitkat AOSP ROM


The problem may occur because the differences designs of Samsung Touchwiz Android smartphone and AOSP based ROM. The Samsung Android smartphone which using Touchwiz as the stock ROM is designed with psysical / hardware keys button where it replaced the soft navigation keys (navigation bar).

On an Android device using soft navigation keys, the three dot / three line icons menu button appears beside the main navigation keys when it needed. But Samsung has modified the default by removed the soft navigation keys (navigation bar) and then move it to outside the screen as psysical (hardware) button.

android homescreen with navigation bar soft keys
Screenshot of navigation bar / soft navigation keys

And I think there are some Android application developer prefer to use this method, where it detect a Samsung Touchwiz ROM with psysical navigation keys it will show three dot / three line icon Menu button on the application user interface. But when it detect an Android smartphone with soft navigation keys it will hide the three dot / three line icon Menu button on application user interface, because a menu button already appear beside the soft navigation keys.

So when you change your Samsung (or other manufacturer) device ROM to AOSP based ROM like CyanogenMod, the application which prefer above method will be tricked to think that your device is an AOSP based ROM device with soft navigation keys.

Access the missing menu button on Samsung smartphones running AOSP Android kitkat based ROM like CyanogenMod 11


There are two options to bring menu button if you experiences condition like above on your Android device, it is by mapping menu button as additional keys to existing keys and the second option is by activate the soft navigation keys:

  1. Adding menu button as additional key function to existing keys


    The first option is done by adding additional function (where the additional function is Menu button). This happen when I was using CyanogenMod ROM on my Samsung Galaxy V. Just go to "Settings" -> "Buttons", now choose from the available button, example I choosed using the HOME BUTTON -> "Long press action", then set to "Open / close menu", done! So now we can call the Menu in application by doing long press on the Home button.
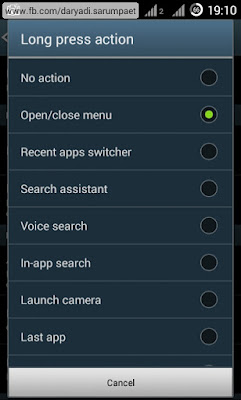
    buttons setting menu long press

    If the ROM you using are not give you the Button option on Settings (Buttons option is not exist), there is also another way to map the Menu button as an additional keys to existing keys by using Xposed module like Xposed Additions or Gravity Box. Read: Post about Xposed Additions module or Post about Gravity Box module.
  2. Activate the soft navigation keys (navigation bar)


    Well the second option is to bring up the soft navigation keys itself, which this will make your Android device screen to be cut a little. This can be done by modifying the system build.prop, so a file explorer/file manager with root ability is required.

    Find the build.prop file at root directory /system/. Edit the build.prop file, then search text for qemu.hw.mainkeys line, change the value to 0 so it will become: qemu.hw.mainkeys=0.
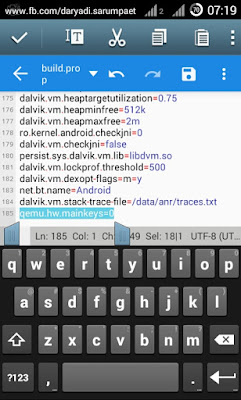
    edit build.prop qemu.hw.mainkeys

    If the "qemu.hw.mainkeys=0" is not exist on your build.prop file, then you must add it manually. Copy the:
    qemu.hw.mainkeys=0
    and paste it to the last line of your build.prop. Reboot your device. After reboot go to "Settings" -> "Buttons", scroll down and find NAVIGATION BAR section -> "Buttons and layout", from there you can assign the Menu key to be placed on the soft navigation keys / navigation bar.

    buttons setting menu navigation bar

Backup All Your Android Games and Applications to Your SD Card Using Titanium Backup APK

Do you like to change your Android device ROM? Or need to uninstall an application because you want try a new application or game because running out of space? Then Titanium Backup apk Android application is a must have Android application for you.

On the older post, I had share about the same kind backup application using Helium application APK. But i didn't satisfied with it because there are some application and game which failed to backed up by Helium. Read: How to Backup Android Phone Applications and Games Data using Helium APK.

Titanium Backup APK Android application is became "the ultimate root app" since several years ago. The main feature is we can backup our installed Android application and game APK and the data directly to phone storage or external SD card. It is very good especially if your phone does not have backup feature (i read there is some Sony phones which disabled backup feature).

Hey is backup Application is one of standard feature in Google Service which exist on the Android phone? That's right, but it need to upload the application's data to the Google server which will cost you time, energy (battery), and even money if you use it through mobile network. And moreover, if you uninstall the Android application or game then you need to re-download it first from Play Store before you can restore / download the Android application data.

Titanium Backup APK Android application can backup every Android application and game directly to phone storage or external SD card, we can change where the backup should be saved in the preferences. The advantage, that Titanium Backup also will backup the .apk file of the Android app or game. So we can restore the backed up Android application or game exactly just like when we backed it up from save data, setting, even to the smallest part will be backed up.

titanium backup android application main interface

titanium backup android application game list

Titanium Backup APK Android application features


Just like I said above, backup Android application and game is just the main feature of Titanium Backup APK. There are dozens other features from this Android application like:
  • Uninstall bloatware (system application)
  • If we have updating an Android Application or game and we had backed up the older version, we can downgrade the application.
  • Backup and restore phone important data like browser bookmarks, phone, sms, etc to and from a .xml file.
  • Integrate system application update to ROM so it can conserve more free storage in your phone.
  • Extract and restore application from a nandroid backup.
  • And many more...
Of course all that flashy features need a ROOT present on your Android device. And also some additional feature can be unlocked by purchase the Titanium Backup Pro addon on the Play Store.

Titanium Backup APK Android application download link


Lucky Patcher APK + Tutorial Android Application Download

Lucky Patcher apk is an app mainly created for rooted Android smartphone developed by Chelpus with some great feature in it. Well this app is pretty popular in the Android underground world because it can hack (or crack) applications and games so we can hack for free in-app purchase, remove advertising, remove the app's license verification, and some other great feature. It's a one-stop-hack app solution :D. Beside great benefits in it, Lucky Patcher also have some negative risks like bootloop, system unstable, etc, so backup is suggested. But after one year using it, my phone is going okay no problem using it.

This is 3 main feature that made Lucky Patcher app becoming very popular today:
- In-app purchase hack (we can get item, buy stuffs, in app or game for free, wow!)
- Remove annoying ads in apps
- Remove Google license verification from an app.

The following requirement is needed to operating Lucky Patcher app:
- Rooted Android smartphone
- Android version 2.0 or up
- Little knowledge about Android phone
- Backup, if you needed
- Brain :v


How to activate hack free in app purchase in apps or games using Lucky Patcher

  1. Open Lucky patcher.
  2. Tap "Switches".
  3. Tick "Google billing emulation", just make sure the switch become green.

How to block ads on all apps and games using Lucky Patcher

  1. Open Lucky Patcher.
  2. Tap "Toolbox" -> "block ads" -> "block ads on device"
  3. If you experience some errors on Play Store, Play Game, etc, Go to "Toolbox" -> "block ads" -> "clear the local host file"

How to activate License Verification hack in Lucky Patcher

  1. Open Lucky Patcher
  2. Tap on "Switches"
  3. Tick "Google license verification emulation


After the targetted hack toggles have been activated, now the second steps is we must apply the Lucky Patcher patch on app that you want to hack on it:
  1. Open Lucky Patcher and search and choose the app / game -> "Open menu of patches".
  2. Choose what you want to be hacked on it, is it the in-app purchase, license verification, etc. There are also some patching method to choose, for this one you need some experiment or ask someone expert who had patch that apps / game.
  3. There are also some optional options when patching like backup apk file just in case, apply patch to dalvik cache (this help so the patchs could survive better), etc.
  4. Apply the patch!
  5. Now open the app for test it :). Remember, different app may will need different patching method, so if you must experiment yourself or ask someone expert to choose the patch method.

If you have Xposed Installed, it can even easier to apply Lucky Patcher to every app. Just activate the Lucky Patcher patch plus in Xposed module, and go to Lucky Patcher, open the top bar menu -> "Xposed setting" -> Choose what patch you want to apply, and it does not need manual patch on every app anymore.

All credits to:
- Chelpus and Developers of lucky patcher android application
- google.com

Lucky Patcher apk Android app updates changelogs:
  • v. 6.0.7
    - Update translate
    - Update custom patches
    - Bug fixed
  • v. 6.1.5
    - Fix android patch for “Disable signature verification in the package manager” for CM13 arm
    - Translation updated
    - Custom patches updated
    - Bugs fixed.
  • v. 6.4.4
    - Update modded Google Play to 7.3.07.K
    - Update Android patches for arm
    - Update custom patches
    - Update translations
    - Bugs fixed

Lucky patcher update android application version history download link


If you are updating from an older version of Lucky Patcher, it is recommended to uninstalls it first before installing the newer version.

How to Change Android Device Screen Resolution and Density Easily using Resolution Changer APK Application

Have you ever imagine to change your Android device screen resolution? Now I will share how to change Android device screen resolution and screen density using a very easy and nice, nomone Screen Resolution Changer APK.

What is the purpose to change the Android device screen resolution? Well by change the screen resolution and DPI (Dot Per Inch) / density, there is some purposes like:
  1. Make a device screen looks bigger or smaller
  2. Increase performance on the Android device by set smaller resolution or higher screen density, because it means everything on the screen is rendered with lower quality.
  3. Render more object and graphic on an Android device screen by increasing the screen resolution or reducing the screen density.
  4. Fix the PPSSPP emulator application "Native device resolution" and "Auto 1:1" graphic rendering that causing black dotted graphical bug on older Android version (older than Android Kitkat). I will tell you more below.

screen resolution change before after samsung galaxy v android

PPSSPP emulator application black dotted screen bug on older Android version is fixed by increasing screen resolution


Yeah, this one is definitely true happen on my Android phone Samsung Galaxy V. But the bug is also came only when I using ROM with Android KitKat. The black dotted screen is not appear when I used ROM with Android 5 Lollipop and higher.

When using PPSSPP emulator application on my Samsung Galaxy V, I do not know why if I render the graphic same as my screen resolution the screen is going blacked. Rendering same as my phone screen resolution is the only option I can get better graphic quality and get better performance and speed at the same time. Because if I render on 2x PSP resolution, the game become very laggy.

Accidentally when I want to change my Samsung Galaxy V phone screen resolution using Nomone Resolution Changer so I can make it "looks" bigger, then I start to play games using PPSSPP emulator surprisedly it can fix the black dotted bug.

How to change Android device screen resolution and density using Nomone Resolution Changer application


Requirements:
  • Rooted.
  • Backup.
  • Install third party launcher and keyboard. It is to anticipate if your stock launcher and keyboard cannot adapt to different screen resolution and DPI, so you can still operate your Android device normally by switching to third party launcher and keyboard.

Just install the Android app Nomone Resolution changer. Open the app and there we can select the screen resolution and DPI template. Or if we know exactly what screen resolution we want that can match our Android device, we can also enter manually the exact screen resolution and DPI settings.

nomone screen resolution android application select template

Beware that if the template is not supported by the device System UI, the system will constanly give crash toast message. Do not worry because the Nomone Resolution Changer app is already have prevention step.

After we change the screen resolution it will give 10 seconds dialog are you want to apply the new value for furthermore or not. If we not choose to apply it after 10 second, it will automatically restore to our Android device original resolution and DPI. So, in case things goes wrong, just ignore the dialog and it will restore to original resolutions and DPI settings of our Android device.

If your purpose is to solve the blacked screen bug on PPSSPP native device resolution render display on your Android device, it is enough to increase all the value just a little bit, example 1.1x of original so the device performance is not affected too much because we render the screen on higher resolution.
• Example if your Android device original screen option values are: widht=480, height=800, DPI=240.
• Then the new value should: width=528, height=880 DPI=264(or original).
Above setting is able to solve the blacked screen bug on PPSSPP emulator with native device resolution on my Samsung Galaxy V running Android KitKat.

After every you change your Android device screen resolution and DPI, it is recommended to restart your device to optimize the change.

Nomone Screen Resolution Changer APK Android application download link


# NOMONE SCREEN RESOLUTION CHANGER v. 1.8.apk (4.7 MB)

PHH Superuser - Alternative Open Source Rooting Method for Android

"PHH Superuser is the new player on the Android superuser / supersu app management. I am pretty confident this is a trusted supersu management because the project is open sourced. PHH Supersu is a modification / tweak from the open source Superuser project by Koushik Dutta (Clockworkmod) . PHH Superuser is created in hope to works on more device than Superuser can reach."

Root is mode on Android device where the system is unlocked and opened for modification. It can unlock the full potentiall of an Android device. On modern Android device like today, we must have some method to controll the powerfull potentiall of root so application that demand for root access is not harm the device system.

By using a superuser application, all apps that demand for root access must have been granted the permission first from the superuser app. And that method is by using superuser managements application to controll the root, and one of the newest is PHH Superuser. "PHH" is taken from its founder name, Pierre-Hugues Husson.

I think PHH Superuser is rooting Android device using "systemless" method. I can figure it because every I boot my Android device from TWRP recovery, it always says "device not rooted". In fact, the root is exist and all of my root application is working well.

If you love the Clockworkmod app and have tried the Clockworkmod Superuser rooting method did not work on your Android device, then you must try this method. Because the same thing is happened to my Samsung Galaxy V SM-G313HZ stock ROM.

phh superuser main interface

The transfer of Chainfire Supersu ownership to Coding Code make me seek alternative of superuser app


At older post I have share how to root Android using Chainfire SuperSu. That method is the most favorite of Android users, and because it have good root command compatibility make it never fail on giving permission and access to all root application on every Android device.

But since the recent news, Chainfire decide to transfer the ownership of SuperSu to relatively unknown and "shady" corporation who called themself Coding Code Mobile Technology (CCMT). Then I start to questioning the security and integrity of SuperSu, especially to the new owner CCMT.

News spreading, the rumors of folks at Android community is also flying. Who is CCMT? Is they trusted? But all the rumors questioning their integrity just gotten bigger and bigger as why they even do not came out and "show their face" to the Android community to make some clarification and declare their integrity holding such a powerfull root management application called SuperSu.

But CCMT is still just a shady corporation to me now. And I am very care to my security and privacy. That is why also the folks at XDA is start seeking alternative superuser and rooting method, especially the one who declare that he is an open source superuser app. Now, PHH Superuser is my number 1 choice on root management app on my Android phone.

How to root Android device using PHH Superuser


Requirements:

  1. First thing first, if you are trying to replace your old superuser app with this PHH Superuser, you must unroot your device first (the option is usually exist in the superuser app option), so there is no code conflict each other. Or if you are rooting your Android device using systemless root by Chainfire SuperSu before, you must restore your Android device boot img to the original just like before installing it.

    If this is the first time you rooting your Android device, then you can just simply ignore this first step.
  2. Installing zip flashable. Now we will root the device by flashing the Superuser zip file. Just straight boot your Android device into recovery mode, and install the Superuser zip file. After it is done, reboot device.
  3. Now the Android device is rooted, we need to install the PHH Superuser.apk application. You also can find it on Play Store.
  4. Done. Now the PHH Superuser is ready to act as root management app.

PHH Superuser download link


-> PHH Superuser flashable.zip (3.7 MB)

-> PHH Superuser.apk (1 MB)


Read more on the official thread of PHH Superuser on XDA Forum.