Showing posts sorted by relevance for query backup. Sort by date Show all posts

Backup All Your Android Games and Applications to Your SD Card Using Titanium Backup APK

Do you like to change your Android device ROM? Or need to uninstall an application because you want try a new application or game because running out of space? Then Titanium Backup apk Android application is a must have Android application for you.

On the older post, I had share about the same kind backup application using Helium application APK. But i didn't satisfied with it because there are some application and game which failed to backed up by Helium. Read: How to Backup Android Phone Applications and Games Data using Helium APK.

Titanium Backup APK Android application is became "the ultimate root app" since several years ago. The main feature is we can backup our installed Android application and game APK and the data directly to phone storage or external SD card. It is very good especially if your phone does not have backup feature (i read there is some Sony phones which disabled backup feature).

Hey is backup Application is one of standard feature in Google Service which exist on the Android phone? That's right, but it need to upload the application's data to the Google server which will cost you time, energy (battery), and even money if you use it through mobile network. And moreover, if you uninstall the Android application or game then you need to re-download it first from Play Store before you can restore / download the Android application data.

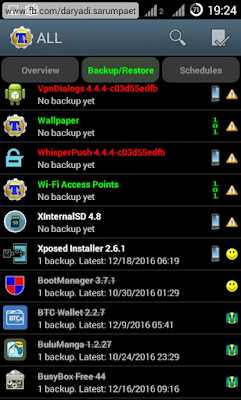
Titanium Backup APK Android application can backup every Android application and game directly to phone storage or external SD card, we can change where the backup should be saved in the preferences. The advantage, that Titanium Backup also will backup the .apk file of the Android app or game. So we can restore the backed up Android application or game exactly just like when we backed it up from save data, setting, even to the smallest part will be backed up.
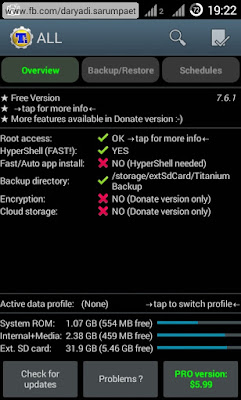
titanium backup android application main interface

titanium backup android application game list

Titanium Backup APK Android application features


Just like I said above, backup Android application and game is just the main feature of Titanium Backup APK. There are dozens other features from this Android application like:
  • Uninstall bloatware (system application)
  • If we have updating an Android Application or game and we had backed up the older version, we can downgrade the application.
  • Backup and restore phone important data like browser bookmarks, phone, sms, etc to and from a .xml file.
  • Integrate system application update to ROM so it can conserve more free storage in your phone.
  • Extract and restore application from a nandroid backup.
  • And many more...
Of course all that flashy features need a ROOT present on your Android device. And also some additional feature can be unlocked by purchase the Titanium Backup Pro addon on the Play Store.

Titanium Backup APK Android application download link


How to Backup Android Phone Applications and Games Data using Helium APK

Based on my experience, i like to change ROM but when I change my Android Smartphone ROM of course the app and the DATA will also be erased (as the wipe data process). It's sucks that i must re-setting my apps again and the worst is i must start my games like GTA, Final Fantasy, etc again from zero -_-. So searching in the internet i finally found how to backup all my apps and games data using and app called "Helium".

With Helium we can backup and restore applications data in many ways we like. We can backup our apps and games data directly to our internal / external memory card and restore it directly too if we are on ROOTED. Or if you are not rooted, you can still backup with USB cable to your computer, though you will need Helium Desktop companion software installed on your computer. Or we can also backup the apps data's to Google drive server (need to buy helium premium).

Not that based on my experience, some error happen to some apps when the backup process is running. So i sugget you to backup the app and game one by one (to know which app is backup-able or not).

How to backup our Android phone apps and games data without PC


helium app backup data

  1. Make sure your Android phone is Rooted.
  2. Open the Helium app, and don't forget to give it superuser rights if asked.
  3. Tick the app / game you want to backup. We can drag up the bottom menu to give us more option, like what is to be backed up, is it only the data or the data WITH the apk / app (i suggest to backup only data in terms of speed, as we can backup the apk later by other apps like App Backup and Restore, etc). Choose where you want to backup it, i prefer external SdCard as it have great space. Tap on "Backup" to start the backup process and wait until done.
  4. To restore our app data go to "Restore and Sync" tab, and choose where you save the backup file (the backup directly to the memory is saved at directory "<PREFFERED STORAGE>/carbon")

Helium apk download link


# HELIUM v. 1.1.4.2.apk

How to Full Backup Your Android Smartphone Content and Data Without PC / Computer

Nandroid Backup is a name for full backup from your current Android smartphone ROM and content like app, data, and even the system. In simple meaning by creating a Nandroid backup, we like give our Android phone "a second life" :v , in case our Android phone is dead (we called it "soft brick") there is still one chance to revive it again by restore it from the nandroid backup. So it is highly recommended to create a nandroid backup when you are going to make big modification like change ROM or do a high risk operation from your Android smartphone.

However, to create a Nandroid backup Without a computer we must already have a custom recovery installed on our Android phone (TWRP or CWM recommended). We can install a custom recovery via Odin (need computer) or just flash it directly from our Android phone like one click through app called flashify (root needed).

Requirements:
* Custom recovery installed. TWRP or CWM recommended.
* a Lots of External SdCard empty space. It is recommended that you have empty space in your external sdcard bigger than your current used internal memory size.


Steps how to full backup your Android smartphone content


  1. Go into recovery mode. Turn off your Android phone, and then press and hold simultaneously the POWER + HOME + VOLUME UP button and hold it for least 5 seconds, quickly release the buttons when the phone vibrate.
  2. * If you are on CWM recovery: Go to "Backup and Restore" -> "Backup".
    Note that if you have move some of applications to the external memory, it will also be backed-up so the nandroid backup size may be bigger than expected.

    * If you are on TWRP: Go to "Backup". By this way we can choose what to be backed up is the system only, the data (application and data), etc.
    Oh and don't forget we can choose the storage location too by tap on "Select storage" to choose between internal memory or external memory (recommended).
  3. * You can restore your Android phone through the "Backup and Restore" -> "Restore" menu, if you are On CWM.

    * If we are on TWRP recovery, we can restore our Android phone from the "Restore" menu, and we also can choose what to restore too.

The Nandroid backup file we made will be stored at "storage/extSdCard/clockworkmod/backup" for CWM and "storage/extSdCard/TWRP" for TWRP recovery (if you choose the external sdcard as backup location). Now you are free to modification your Android smartphone or make mistakes as much as you want :v . In case something terrible happen or your Android phone is soft bricked, just restore it from the nandroid backup you WAS made, right ? ;-) .

Install TWRP v 3.0.0.0 Recovery Without PC or Computer Samsung Galaxy V SM-G313HZ

TWRP (Team Win Recovery Project) is another one of the most used custom recovery for Android smartphone. This time i will share TWRP for samsung galaxy v SM-G313HZ, vivalto KST kernel (had OTA updated before), and can be installed without PC / computer (through recovery). For you who use another kernel (or have not update your device via OTA), maybe you can try this recovery too, but maybe i can not guarantee the success. So make a prepared backup, and do with your own risk. You also can use Flashify v 1.6.6 app to backup your current recovery and restore it later when you need.

twrp 3.0.0.0 custom recovery samsung galaxy v


Requirements:
- Rooted
- CWM recovery installed
- File TWRP 3.0.0.0 VIVALTO.zip (+- 8.4MB)
- Backup as needed
- Brain :v


TWRP recovery for Samsung Galaxy V device is made by Indonesian, one of member XDA forum cleverior.ipul. Why we need to choose install TWRP, although before we have installed CWM, it is just the same? You right, but after installed TWRP i just realized that there is so many benefit and advantage that i don't found on CWM recovery before, like TWRP is support touch, so we don't need to press the hardware key of our device many times that will cause to earlier key broken on our device.

Some features that i do not found on CWM recovery previously i installed:
  • Touch support
  • We can take screenshot by pressing key: volume down + power
  • We can choose where we will save the backup (internal or external)
  • We can choose what partitions we want to backup (is it backup just the system, the data, etc...)
  • Nandroid backup size is smaller (because it don't backup internal, it's good as internal itself is part of device MEMORY). When create Nandroid backup using CWM i found the size is +3 GB, but when using TWRP it's just +-1 GB (can be smaller by check the "compress" option)
  • File manager (in "Advance" menu")
  • And many more...

Installation TWRP 3.0.0.0 Samsung Galaxy V without PC / computer


Download the flashable zip file of TWRP 3.0.0.0 above, place it on your external memory card. Just straight put your device into recovery mode, choose "Install zip" -> "Choose zip from sdcard", find and choose where you put the TWRP zip file, choose " Yes...". Reboot smartphone (or automatically reboot).

When we go to recovery mode with TWRP for the first time, there will be a warning wizard that is you want to use the TWRP for JUST THIS TIME or want to use it PERMANENTLY (replace your stock recovery). If we want to use it permanent (replace the previous recovery), we must accept the TWRP to change the system to make TWRP permanent on our device. Just read the first wizard...

Source and thread: XDA Forum

What is Bootloop, Soft Brick, and Hard Brick on Your Android Device and How to Solve It

"Hey do your phone never got bootloop? Then you are not blessed one yet" :D . That's the word i hear often in the facebook group (in Indonesia) where the Android entusiast gathered. It means, bootloop is not something like you are going to die, but it's something you must face everyday if you declare yourself as an Android modder or entusiast. Bootloop on my Android phone is just like breathing in my life :D .


android injured

Actually, bootloop is just the most easy situation to handle on your Android device if you make a fail modification or hack on it. There are his big brother which worse called "soft brick" and "hard brick". And this is the difference between them:

Bootloop on Android


boot animation cyanogenmod
(source: forum.xda-developers.com)

The name said it all, a looping on booting process. Bootloop is happen if you make a fail modification or hack to your Android device, and after you restart your Android device it is just give you a boot animation on the screen forever.

You know boot animation right? Boot animation is like the gif image you see when you waiting for your Android device to live and enter homescreen. Example boot animation on Samsung Android device is the Samsung logo with white dot splash animation. Boot animation on CyanogenMod ROM is Cyanogen alien face with animation of white circle around it.

The boot animation process is usually take 1 to 5 minutes. But in bootloop state, it will take forever. Even if you waiting 1 hour, 3 hour, your device won't start.

Usually if you make a modification by flashing a zip file through recovery and the result is gave you a bootloop, it can be fixed by also flashing the uninstaller zip file provided by the mod author's to remove the modification from the device system. Example from the Xposed installation on Android Lollipop and up, it require us to install a zip file through the recovery and if the result is gave us a bootloop, to fix it just simply flash the uninstaller zip file which the developer provided

To fix bootloop is just simply restore from your Android device nandroid backup or flashing some uninstaller zip file where the mod authors provided.

Soft Brick on Android


boot logo samsung galaxy s 6
(source: forum.xda-developers.com)

Softbrick on Android is a state where the device even not enter boot animation. The device just pass untill boot logo and then it will like that forever.

Different with boot animation, bootlogo is the static image of the Android device manufacturer logo and usually followed by text at the bottom "Powered by Android". Bootlogo is the first state ever your device will shown on the screen in the booting process. It give you sign that the device is still fixable by yourself if you make a fail modification. The ordered process of device booting is: Boot logo -> Boot animation -> Device live and enter homescreen.

To fix soft brick on your Android device is just simply restore from your nandroid backup. If that's not helped, you need to reinstall the firmware of your Android device with the stock firmware.

Hard Brick on Android


Hard Brick is the worst situation ever happen to your Android device if you make a fail modification / hack where the device is totally dead. It even not showing you the boot logo, the screen is just totally black.

Well, if your Android device got a hard brick don't desperate first. Try to restore from the nandroid backup, and if that not helped try to reinstall the firmware, and if that's not helped too maybe you should take your Android device to the service center or the repairman :D

Best practice when make a modification on an Android device to prepare the possibilities of bootloop, soft brick, or hard brick


If you are going to make modification on your Android device moreover it is a big modification like installing a custom ROM, it is very recommended to make a nandroid backup first.

Nandroid backup is like a snapshot of your Android device which containing whole device content, system, and even installed applications. The nandroid backup is made using custom recovery like CWM, TWRP, etc. So, if something wrong happen to your Android device after did some modification, simply just restore it back from the Nandroid backup you made. Nandroid backup is already save my Android smartphone from bad situations many times i couldn't remember.

7 Reasons That Will Make You Want to Root Your Not Rooted Android Device

Android, the open source project mobile system operation is have fast progress in it's development. But there is one thing cannot be separated from Android OS is it the old Android version or even to the most new Android N Nougat, and it is ROOT.

As we know Android is an open source operating system, so we have rights to modify the system as we like. By Rooting our Android device is the way we can unlock "the security seal" of the device so we can through the deep of the system. Actually for honest, Root is something that every user should not do so easy to his device. As for a rooted device can also bring user some serious trouble like bricking it, to the most important things like security and privacy of the user.

rooted android break chain

Also although Root is something that can void the warranty of an Android device, but still most user will do it anyway as there is so many benefits and advantages they get. But nowaday there is so many information we can get on websites tell us how to Root our Android device easily, and even there is solution to prevent if something bad happen when we did a failed Root.

My myself start Rooting my first Android smartphone Samsung Galaxy V SM-G313HZ when it still 3 months old in my hand. You know what is the first reason why I brace myself to rooted my Android smartphone at that time? To get internet access for free (oopss...) :D.

Now here it is, the 7 reasons that will make a user to root his Android device.

  1. Performance and Function Tweak


    When I just got my first Android smartphone, I'm very happy with it. The first game i was hunting is Final Fantasy III, then I playing it and "awesome". Then i knew that GTA game is also playable on Android, but with size 2 GB, but my phone storage is just 2 GB :( . But there is solutions to trick it, move the data and obb of game to external SD card (which usually have great space like 8 GB, 16 GB, 32 GB, etc...) using some applications like Foldermount or some Xposed module like XinternalSD. And guess what? That's right, the applications is need ROOT :D.

    Also with Rooting your Android device, we can do many things to boost the device performance. There is many ways we can improve the performance of our device like removing unnecessarry bloatware (system applications), using some Init.d scripts, applying tweak to the RAM, and many more.
  2. Better Gaming Experience


    Playing game on Android device is also had many variations too. From Playing the usual Android game to playing some old school games like Playstation Portable using emulator application. One more reason to root your Android device for you who are gaming freak, to get more performance on the game and maximize your gaming experience.

    final fantasy iv the after years android game ceodore vs boss

    Let me give you a hints about the best Android application to maximize your gaming experience, and it is GLTools. By using GLtools application, you can enchant the graphic or even reduce lag and quality so you can play hind end game on an low end Android phone.
  3. Change Display and User Interface


    One the most reason why users root his Android device, it is to change the display and User Interface (UI). Yeah, we can change the color, the statu bar icon like clock, battery, change the Settings background with your girlfriend photo, or even fake the signal to 4G even you use a 3G phone :D.

    There is also many ways to do it, and one of the most popular method is using Xposed module as it is fairly easy to use and not too risky. Some popular Xposed module to modify the User Interface: Wanam Xposed (mainly for Samsung Touchwiz Kitkat), Xblast Tool (for Kitkat and down), or GravityBox (available for Android Jelly Bean to Marshmallow).
  4. Stay Up to Date


    Every Android device of course will get system update from the device Vendor. The update can include of Android OS version or even small updates to fix some minor bugs. But I'm sure an Android device will soon stop getting the official updates as more and more new device released. If we want, we also can take an act to update the system or OS version by ourself.

    Like my Samsung Galaxy V Android smartphone, now i'm running it with Android Marshmallow which originally released as Android Kitkat, although it never get official update from the manufacturer. To do that, I am installing an aftermarket firmware created by third party (non-official) and flash it by myself. It is often called installing a "Custom ROM".
  5. Change ROM


    Like I said above, by Installing a custom firmware or custom ROM (the right one of course...) we can update the OS version. But just not that, by Installing custom ROM is like a total modification also to the Display, performance, new features, and many more.

    custom roms on android

    To install a custom ROM, we need a custom recovery. And root is the only way if we want to install a custom recovery directly and using it by our Android device.
  6. Backup and Restore


    Now this also one more things that pretty important, to easily backup and restore of our Android device content. Actually Google also has offer you a service to backup your device to the Google Drive cloud. But it needs a lot of time and bandwith of course.

    If we have a rooted Android device, we can easily backup it's whole content from the applications, system, the apk's and anythings directly to our external storage, so no computer needed. There are many apps on the market that offer to do that, example the best is Titanium Backup and Helium.

    Or even we can make a full backup of our Android device content and system using the Backup feature on custom recovery like TWRP, CWM, etc as easy as "one tap".
  7. Hack 2 Free and Hack 2 Win :D


    Last but not least, is a bad reasons that is we can get premium / paid Android app or game for free. Or just hack an in-app-purchase of an application or game to get some premium features for free. It need some hacking jobs and some right tools like Lucky Patcher, which need root access of course.


    And also we can hack an Android game like the money, the gold, similar like that if we have root access because the system is already unlocked so we can make changes to everythings.

Like I said earlier, rooting your Android device is something you must think twice before to do it. As we get many benefits, a rooted Android device is also could bring us some trouble including bricking it or some serious trouble about your privacy and security.

I think rooting our Android device is ok if we know what app and what kind of jobs the root application will do to our Android device. And choosing the rights Superuser management app is also an important thing so you can keep your privacy and security safe.

Fix External SD Card on Android 6.0 Marshmallow to Become Full Writable Without Format It as Internal

Android 6.0 Marshmallow is already released and now even already released Android N (Nougat). But there is one major change in the storage access starting from Android 6.0.

The external storage card (SD Card) is not fully writable just like the previous Android version and it also loss of ability to move application and game to the external SD Card but with one condition, we must format the external SD Card and then it will become the part of the device internal storage.

Formatting external SD Card as internal also means that the formatted external SD Card will only work and usable ONLY on that device.

Oh and one more thing, the external SD Card naming is also changes different from previous Android version from /storage/extSdCard/ to /storage/XXXX-XXXX/, where XXXX-XXXX is some combination of numbers and letters.

format as internal external sdcard on android marshmallow

Actually the full write access on external SD Card on Android 6.0 and up is still exist, only to application which got permission to do it. In order to get permission to write on external SD Card, the application must open the "Document storage" and then select the root of external SD Card.

But for the application that not implemented the method (or the app developer is just too lazy to implement it, hehe :D ), the write access to external SD Card is dead (except on directory /storage/XXXX-XXXX/Android/data/domain.application.package.name/.

But for you who don't wan't to format the external SD Card as internal on your Android device, but still want full write and read access, there is one solution using Xposed module called "XinternalSD".

XinternalSD has been tested on my Android smartphone running Android 6.0 Marshmallow, CyanogenMod 13 (CM13) ROM and it could solve the following issues on the following applications i have tested:
  • UC Browser, now i can set the download directory to /storage/XXXX-XXXX/ANYWHEREIWANT/.
  • Helium, now the delete and make backup to external SD Card (/storage/XXXX-XXXX/carbon/) is working properly.
  • Titanium Backup, now i can set the backup folder to /storage/XXXX-XXXX/ANYWHEREIWANT/.
  • And other applications...

Requirements:

xinternalsd main user interface

titanium backup save on external sdcard

Steps how to make external SD Card become full writable on Android 6.0 Marshmallow without need to format it, using XinternalSd


Note that this only make the external SD Card full writable so every application could write and read freely to external SD Card without need permission, and not retrieve the ability to move application or game to external SD Card.

  1. Download and install latest version of XinternalSD.
  2. Activate the XinternalSD module on Xposed.
  3. Open the XinternalSD app, make sure the option "Custom path to internal SD card" and "Full access to external SD card" is √ checked.
  4. Now reboot your Android device and test it yourself...

Bring Up Menu Button on Android Device with Physical Button Running AOSP Based ROM

It's all begin when i changed my Samsung Galaxy V phone ROM to CyanogenMod 11 (Kitkat AOSP based ROM), I then found some issue finding a menu button in some application that gone missing. I got these "missing menu button" on some application like Firefox, Titanium Backup, Catlog, ePSXe emulator, etc.

What is menu button? Menu button is a three dot / three line icon (or using "Menu" text instead) usually placed on top of application user interface. It is used to access the main Menu preferences.

titanium backup menu button appears
Menu button appears

titanium backup menu button missing
Menu button gone

On ePSXe emulator, the menu is used to access the main options like cheats, graphic setting, and other quick preferences. The menu is can be accessed by pressing "back" key when I was using stock Touchwiz ROM of my Samsung Galaxy V phone. But after I changed my phone ROM to CyanogenMod 11 suddenly the "back" key changed to exit menu on the ePSXe emulator application. This also then became an issue when I was using some application like Firefox Browser, Titanium Backup, Catlog app, I can't found the menu button in the app!

What caused the menu button missing on applications on Android Kitkat AOSP ROM


The problem may occur because the differences designs of Samsung Touchwiz Android smartphone and AOSP based ROM. The Samsung Android smartphone which using Touchwiz as the stock ROM is designed with psysical / hardware keys button where it replaced the soft navigation keys (navigation bar).

On an Android device using soft navigation keys, the three dot / three line icons menu button appears beside the main navigation keys when it needed. But Samsung has modified the default by removed the soft navigation keys (navigation bar) and then move it to outside the screen as psysical (hardware) button.

android homescreen with navigation bar soft keys
Screenshot of navigation bar / soft navigation keys

And I think there are some Android application developer prefer to use this method, where it detect a Samsung Touchwiz ROM with psysical navigation keys it will show three dot / three line icon Menu button on the application user interface. But when it detect an Android smartphone with soft navigation keys it will hide the three dot / three line icon Menu button on application user interface, because a menu button already appear beside the soft navigation keys.

So when you change your Samsung (or other manufacturer) device ROM to AOSP based ROM like CyanogenMod, the application which prefer above method will be tricked to think that your device is an AOSP based ROM device with soft navigation keys.

Access the missing menu button on Samsung smartphones running AOSP Android kitkat based ROM like CyanogenMod 11


There are two options to bring menu button if you experiences condition like above on your Android device, it is by mapping menu button as additional keys to existing keys and the second option is by activate the soft navigation keys:

  1. Adding menu button as additional key function to existing keys


    The first option is done by adding additional function (where the additional function is Menu button). This happen when I was using CyanogenMod ROM on my Samsung Galaxy V. Just go to "Settings" -> "Buttons", now choose from the available button, example I choosed using the HOME BUTTON -> "Long press action", then set to "Open / close menu", done! So now we can call the Menu in application by doing long press on the Home button.

    buttons setting menu long press

    If the ROM you using are not give you the Button option on Settings (Buttons option is not exist), there is also another way to map the Menu button as an additional keys to existing keys by using Xposed module like Xposed Additions or Gravity Box. Read: Post about Xposed Additions module or Post about Gravity Box module.
  2. Activate the soft navigation keys (navigation bar)


    Well the second option is to bring up the soft navigation keys itself, which this will make your Android device screen to be cut a little. This can be done by modifying the system build.prop, so a file explorer/file manager with root ability is required.

    Find the build.prop file at root directory /system/. Edit the build.prop file, then search text for qemu.hw.mainkeys line, change the value to 0 so it will become: qemu.hw.mainkeys=0.

    edit build.prop qemu.hw.mainkeys

    If the "qemu.hw.mainkeys=0" is not exist on your build.prop file, then you must add it manually. Copy the:
    qemu.hw.mainkeys=0
    and paste it to the last line of your build.prop. Reboot your device. After reboot go to "Settings" -> "Buttons", scroll down and find NAVIGATION BAR section -> "Buttons and layout", from there you can assign the Menu key to be placed on the soft navigation keys / navigation bar.

    buttons setting menu navigation bar

How to Install CWM Custom Recovery Mode Without PC or Computer Samsung Galaxy V SM-G313HZ

RULES:

- In this blog i just share things that i had done, I am not force you to follow this tutorial so DO WITH YOUR OWN RISK.

- Before begin the tutorial, make a proper backup so you'll not regret this if you fail. And so before installing this CWM, use the "backup recovery" feature on the Flashify app to backup your phone stock recovery. So if the new recovery is not like we expected, we just restore the old one in the Flashify app.

CWM (clockworkmod) is one of the most used custom recovery in Android. We can install CWM recovery on our Android smartphone without PC with the help of Flashify app and an .img cwm file (the img cwm file must be compatible with our android smartphone type).

What is needed:
- Rooted Android smartphone
- Handsome :v

Steps how to install CWM custom recovery mode without PC [Samsung Galaxy V SM-G313HZ]


1. Download and install Flashify v 1.6.6.apk app.

2. Download file recovery.img that compatible with your android smartphone. For Samsung Galaxy V SM-G313HZ Vivalto user, you can download this CWM Recovery vivalto flash.img.

3. Open the Flashify app and don't forget to grant the superuser permission if asked, then choose "recovery image" -> "select file" -> find where you save the recovery.img file -> "yup!" -> "reboot....." (see screenshot)


4. After that we will go to recovery mode (use the volume up and volume down as navigation, and home button as confirmation). Choose "reboot system now" to reboot your smartphone -> Then if there is choices like "...fix supersu...?", or "...disable...?", then just choose "..yes..." just for this first time, for the next time you can choose "...go back..." or "...no..."

Congratulations! Now your smartphone is installed CWM recovery. Now you can install or flash anything zip file you want like more feature, mods, or even change your smartphone ROM.

Source: blogmarcopunya.blogspot.com

>> Flashify v 1.6.6.apk Android Application Download

>> CWM Recovery vivalto flashable#3.img

Lucky Patcher APK + Tutorial Android Application Download

Lucky Patcher apk is an app mainly created for rooted Android smartphone developed by Chelpus with some great feature in it. Well this app is pretty popular in the Android underground world because it can hack (or crack) applications and games so we can hack for free in-app purchase, remove advertising, remove the app's license verification, and some other great feature. It's a one-stop-hack app solution :D. Beside great benefits in it, Lucky Patcher also have some negative risks like bootloop, system unstable, etc, so backup is suggested. But after one year using it, my phone is going okay no problem using it.

This is 3 main feature that made Lucky Patcher app becoming very popular today:
- In-app purchase hack (we can get item, buy stuffs, in app or game for free, wow!)
- Remove annoying ads in apps
- Remove Google license verification from an app.

The following requirement is needed to operating Lucky Patcher app:
- Rooted Android smartphone
- Android version 2.0 or up
- Little knowledge about Android phone
- Backup, if you needed
- Brain :v


How to activate hack free in app purchase in apps or games using Lucky Patcher

  1. Open Lucky patcher.
  2. Tap "Switches".
  3. Tick "Google billing emulation", just make sure the switch become green.

How to block ads on all apps and games using Lucky Patcher

  1. Open Lucky Patcher.
  2. Tap "Toolbox" -> "block ads" -> "block ads on device"
  3. If you experience some errors on Play Store, Play Game, etc, Go to "Toolbox" -> "block ads" -> "clear the local host file"

How to activate License Verification hack in Lucky Patcher

  1. Open Lucky Patcher
  2. Tap on "Switches"
  3. Tick "Google license verification emulation


After the targetted hack toggles have been activated, now the second steps is we must apply the Lucky Patcher patch on app that you want to hack on it:
  1. Open Lucky Patcher and search and choose the app / game -> "Open menu of patches".
  2. Choose what you want to be hacked on it, is it the in-app purchase, license verification, etc. There are also some patching method to choose, for this one you need some experiment or ask someone expert who had patch that apps / game.
  3. There are also some optional options when patching like backup apk file just in case, apply patch to dalvik cache (this help so the patchs could survive better), etc.
  4. Apply the patch!
  5. Now open the app for test it :). Remember, different app may will need different patching method, so if you must experiment yourself or ask someone expert to choose the patch method.

If you have Xposed Installed, it can even easier to apply Lucky Patcher to every app. Just activate the Lucky Patcher patch plus in Xposed module, and go to Lucky Patcher, open the top bar menu -> "Xposed setting" -> Choose what patch you want to apply, and it does not need manual patch on every app anymore.

All credits to:
- Chelpus and Developers of lucky patcher android application
- google.com

Lucky Patcher apk Android app updates changelogs:
  • v. 6.0.7
    - Update translate
    - Update custom patches
    - Bug fixed
  • v. 6.1.5
    - Fix android patch for “Disable signature verification in the package manager” for CM13 arm
    - Translation updated
    - Custom patches updated
    - Bugs fixed.
  • v. 6.4.4
    - Update modded Google Play to 7.3.07.K
    - Update Android patches for arm
    - Update custom patches
    - Update translations
    - Bugs fixed

Lucky patcher update android application version history download link


If you are updating from an older version of Lucky Patcher, it is recommended to uninstalls it first before installing the newer version.

Zentouch Final - Custom ROM Samsung Galaxy V SM-G313HZ

Finally after 6 months i have Android smartphone Samsung Galaxy V SM-G313HZ, I brace myself to install a custom ROM by myself :v. Because before i hesitate to do it 'cause i don't have my own PC, what if something happen and there is no Computer / PC at that moment? But because i very want to change the display / theme and maybe it will get some performance increase, with some prepared backup and a little read from many guides, Alhamdulillah it was success with smooth hehehe :).

Moreover Samsung Galaxy V SM-G313HZ is classified to low end smartphone device, so the Custom ROM for it is not many. Allright check it out my ever first custom ROM installation, Zentouch. Maybe this custom ROM name come from ZENfone and TOUCHwiz, Samsung ROM (Touchwiz) with some Zenfone taste (maybe something like that :-/ ).

After i change to this ROM, i feel my device is a little smoother either with gaming (maybe because the bloatware is removed and the system app is zipaligned). Even this ROM had come to the final version, it is unfortunately there still some bugs when i try it.

Requirements:
- Custom recovery installed
- Backup as needed
- Brain


Title Zentouch ROM Final
Author Hyekal Hitech
Size +- 281 Mb
Features * Rooted
* Deodexed
* Zipalign system App
* Bloatware removed
* Disable signature apps
* Asus Calculator
* Asus Deskclock
* Asus Recorder
* Asus Gallery
* Asus Launcher
* Asus Browser
* Asus Music Player
* Asus File Manager
* Asus Calendar
* Asus Do it later
* Redesign Desain System Icon ke Asus Icon
* Asus Theme Settings (LookALike)
* Statusbar Contextual Header
* And many more...
Source / thread Galaxyvarchive Blog
Download link Zentouch Final Custom ROM.zip

Installation:

!!! Highly recommended to install it from fresh stock ROM !!!

Example using custom recovery CWM:
- Reboot to recovery mode.
- Do "Wipe cache partition".
- Go to "Advance" -> "Wipe dalvik cache", after done go back.
- Choose "Install Zip" -> "choose zip from sdcard", find where you put the archive file of Zentouch ROM and choose it -> "Yes" -> Wait untill installation process done -> " Go back".
- Choose "Advance" -> "Wipe dalvik cache"
- Reboot smartphone, wait patiently for the apps optimizing.

Few bugs you MAYBE experience:

Q: Google Play Service and com.process.googlegaps always "stopped"?
A: Delete the Google Play Service system app (you can freeze it first to make it easier). Download the newest version of Google Play Service App from another website and install it manually.

Q: ASUS File Manager force close when try to extract something?
A: That file manager is ported from Zenfone 5, it is "ported", so it will not be 100% perfect like the original

Q: Asus Launcher force close?
A: Pull down the status bar and go to "Settings" by tap the setting shortcut icon, in Settings go to "Application Manager", slide to the left untill you are in "All Applications", find Asus launcher app, do a "delete data" and "delete memory" / cache.

Q: White text on white background on some little part of Settings?
A: Not a big problem :)

Note: I'm here just as a user, so if you have advance question or advance want-to-know, please visit the source link.

Touchwiz Launcher Mod with Theme Chooser for Samsung Galaxy V SM-G313HZ

Now i will share a touchwiz launcher mod for you who are a Touchwiz lovers :D , what is the mods? There is a theme chooser feature on it. Yeah i have used it back months ago when i just got my Samsung Galaxy V SM-G313HZ.

This launcher may only works on Samsung Android Kitkat stock ROM and Touchwiz Kitkat based ROM's like Zentouch, Palents, Nemoid, etc and MAY NOT work on custom ROM (firmare) like CyanogenMod.

Basically, this Touchwiz launcher mod is ported from Samsung Galaxy Grand Prime for Samsung Galaxy V by a member of Official Samsung Galaxy V group, Ariel Alexandria.

Requirements:


Steps how to install touchwiz launcher mod with theme chooser

  1. First for you who use an ODEX ROM, using any file manager (root explorer), go to "system/priv-app/", and move or delete the "SecLauncher3_ESS.odex" file.
  2. Download the Touchwiz Launcher zip file (link at the end of post) and save it in your sdcard.
  3. Go into recovery mode.
  4. Just straight install zip, and install the touchwiz launcher mod zip file. Wait untill done, wipe dalvik cache, and reboot your Android smartphone.
  5. To change the theme, do a long press on the launcher homepage, and select "theme".

To download additional theme, you can visit this thread at XDA Forum, there is huge collection created by the members there :D .

-> Download TOUCHWIZ LAUNCHER MOD WITH THEME CHOOSER.zip (+- 19 MB)
VIA MEGA (original link) | VIA USERSCLOUD (mirror link)


Source: GalaxyVarchive Blog

How to Accelerate Your Android Device

How to Accelerate Your Android Device

Android phones now exist almost everywhere ranging from low specifications to very sophisticated. Over time, each phone will be slower; This is why you must maintain the smoothness of the phone with a few simple steps in this article.
  1. Reset your phone. Arrange reinstall everything and restore your phone as before, which is "like new". This is a temporary choice, because when re-used phones will start to slow down again as usual. Back up contacts, memos, and other important information (such as passwords stored in the browser) before doing this step.
  2. Look internal memory space. The low internal memory could cause severe delays on the phone. Move media (images, mp3 files, video, etc.) to external memory such as SD cards. Some low- and moderate-specification mobile phones typically have a low internal memory, so move your files to the SD card will not help much.
  3. Root your phone. Root means giving more authority to the phone. Despite the risks of rooting, but the risk is not as big as before. Root process that failed to make the brick phones (eg malfunction). In addition, to root the phone will void the warranty. However, you can do unroot the phone (and cell phone warranty returns, because manufacturers cannot know if your phone is ever to be rooted before). Here is a list of things you can do after rooting your phone:
a.       Overclock the processor phones. This will ultimately speed up the phone but will consume more battery than before.
b.      Installing a special ROM. ROM is basically an Android version installed in the phone. Special ROM ROM is not official, but as part of a special ROM works better than the official ROM itself. Special ROM can solve many problems, including slowness and update the version of Android, but the solution is very technical, risky and not recommended, due to special ROM sometimes unstable, contain or eliminate damage to the official ROM features.
c.       Removing unwanted default application. Before you delete some applications, consider the following two points:
d.      Download the backup application, such as Titanium Backup to back up the application before deleting (just in case if you want to restore).
e.       Do not let you remove system applications, such as the launcher or the status bar.
f.       Perform root also gives you access to more technical applications, such as root call blockers, normal and notification ads blockers and root memory managers. Root memory manager is usually better than the auto task killer app.

How to Break an Unlock Android Device

How to Break an Unlock Android Device
Android Device

To prevent others from accessing your phone, you should enable some security settings. Generally, Android provides security features that are very useful and you can enable to protect the device from the hands of ignorant. Two commonly used security feature is the pattern lock and PIN. Unfortunately, you may no longer be able to access your phone if you forget to lock pattern or password. Although locked out of the device itself feels annoying, you can use the device again by circumventing security settings and break down your Android phone.

1.      Using android device manager

a.       Visit http://www.google.com/android/devicemanager. Google provides a variety of device management features on this site, you can use without having to touch your device. However, depending on the type of device, the following steps may not be applicable to your device.
b.      Sign into your Google account. You will be prompted to enter your Google account credentials. If you have multiple Google accounts, enter the appropriate credentials with the phone.
c.       Click the "Lock". On the left side of the screen under the name of the device, you'll see three options: Ring, Lock, and Erase. Clicking "Lock", although it does not seem logical, will allow you to set a temporary password that will override the lock pattern or PIN number.
d.      Enter the password you have set on the device's lock screen. Now, you can access the device back.

2Using Key Pattern

a.       Try entering five wrong pattern. To access the option of resetting the lock screen, you need five times incorrect correct pattern. Make sure to pass at least four points when trying to enter the wrong pattern. This method can only be used on the lock pattern.
b.      Tap the "Forgot Pattern?" at the bottom of the screen. The screen lock will open.
c.       Enter your backup PIN. If you remember the PIN backups made when creating a pattern lock, enter now to unlock your device. However, if you do not remember this PIN, open the device with a Google account.
d.      Enter your Google account data to unlock the device. You can sign in to your Google account to unlock, as long as the account was the same as used in the device.

How to Fix Write Permission in External SD Card on Android Kitkat

Have you experience when using your Android smartphone (Android Kitkat and up especially) and trying to make a file / folder or trying to extract archives files (.zip, .rar, etc) in the external SD card (storage/extSdCard/) but it end with failure or failed process? It could be not an error or the archive file is broken, but it is one of limitation on Android Kitkat (4.4.x) that applications except system applications can not do a write / execute operations in the external SD card in vain. So how we solve this, because we very need the full access of external SD card moreover if our device internal storage is so small like mine? It is fairly easy, we can use SD card write fix application like Nextapp SDfix. This tutorial work good on my Android smartphone Samsung Galaxy V SM-G313HZ (Kitkat 4.4.2)

Quoted from the developer:

"NextApp SDFix will modify the configuration file located at /system/etc/permissions/platform.xml to allow apps to write to the MicroSD card. Specifically, SDFix will add the Android UNIX group "media_rw" to the WRITE_EXTERNAL_STORAGE permission's configuration. This will enable apps (only those that you granted write access permissions to when you installed them) to write files to the MicroSD card. On many devices, this is effectively reverting the state of this permission back to the way it was configured in Android 4.3. This modification is carried out by modifying the existing XML file, rather than replacing it."

Requirements
- Rooted.
- NEXTAPP SDFIX.apk (+- 402 kB) app.
- Backup, if needed.


Steps fixing external SD card write permission on Android Kitkat


  1. Download and install Nextapp Sdfix app.
  2. Open the Nextapp sdfix and don't forget to give it superuser rights if asked, and read the instruction. The process is just as easy as One Click and just need a seconds.
  3. Done, reboot your Android device and now your valuable and rich-space external SD card is fully accessable in your Android smartphone device.

Defiant07 Swap Init.d Script - Improve RAM Performance on Your Android Device

Now i will share a tutorial to imrove your Android device performance by tweaking the memory (RAM) using swap, and we will use init.d script called (and you may notice the creator by the script name) "Defiant07 swap script".

Personally i use swap RAM and disable the zram to increase performance on my mid-entry smartphone Samsung Galaxy V. It is proven (at last to me) can reduce lag and imrove multitasking ability. Before, i use RAM Manager Pro to did it. But recently since i found Defiant07 Swap script, later i switch using it, as it can send the swap RAM command directly to system without any additional app running so it won't use RAM and CPU for it. I use it on my Android smartphone running CyanogenMod 13 (6.0 Marshmallow) and the results is satisfied to me.

There are 2 methods to do swap RAM on our Android device using Defiant07 script. Both of them will require us running the script command to set and create an init.d scripts. One option via script manager app, and the other one is via terminal emulator. Choose the one suits you.

Requirements:


defiant07 swap script command terminal emulator

screenshot ram and swap diskinfo app

Installation Defiant07 swap script


Via Terminal Emulator (Flashable)


Tools:

Steps:
  1. Flash the Defiant07 swap it on zip file through recovery, reboot your Android device.
  2. Open Terminal Emulator app, type: su, enter, then type: swapit, enter.
  3. Follow the instruction to create setup for your swap and RAM setting preferences.

Via Script Manager (Non flashable)


Tools:

Steps:
  1. Download and extract the Defiant07 swap for Script Manager method zip file, inside it you will find the script file which you must run using Script Manager application.
  2. Open the Script Manager app, locate the script you just extracted before, and be sure to run it on root mode.
  3. Follow the instruction to create setup for your swap and RAM setting preferences.

Optional steps, disable the zram


Download and place the init.d script disable zram on /system/etc/init.d/. This is just based on my experience that if the zram is not disabled, the swap RAM is likely untouched and useless. Also by disabling the zram, it will reduce lag on your Android device as zram working by compressing block of ram, it will consume cpu resource.

Now after all is done, you can reboot your Android device.


Check out the original thread by Defiant07 at XDA Forum