Showing posts sorted by relevance for query Root. Sort by date Show all posts

Root Dashi APK - Easy Root Your Android Without PC or Computer with One Click

One more application made by Chinese named Root Dashi APK. This application is made for rooting our Android smartphone without PC / Computer, without complicated with just one click (or tap :v ) (internet connection needed). Well what is the essence of my life without root :v , my android smartphone can not be modded, can't hack it, and can't improve it.

This tutorial was written when i got soft brick on my Android Samsung Galaxy V SM-G313HZ, so I must re-root it again because the firmware is reinstalled back, and i try this app.

Even though previously i had shared something like this, but with different app that is "360 root" app. But recently my Android smartphone got a bootloop (worse: "soft brick") because the fail of installing a custom kernel, after restore the backup there is no different, and had I had to re-install the stock firmware of my samsung galaxy v sm-g313hz, that make it back to virgin :v . When the time i was browsing at Android Game Indonesia group, i saw a post about Root Dashi, and it's work on my galaxy v (Android Kitkat 4.4.2).

Step to root your Android smartphone as easy as one click (tested on Galaxy V Kitkat 4.4.2)


  1. Download dan install Root Dashi v. 5.1.6.apk app.
  2. Turn on your internet connection, and then open the Root Dashi app. Just straight tap the blue button with "root" text to begin the operation.
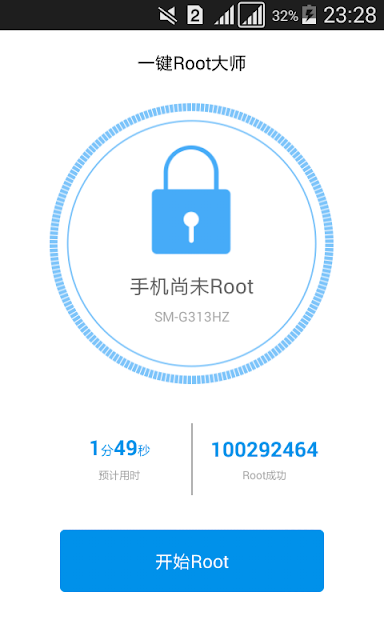
    root dashi click blue button start
    (Tap the blue button to start the rooting process)
  3. Then the rooting process is on the way and wait until 100%. Taraaa done.
    When rooting process is ongoing, maybe Root Dashi app will try downloading an app itself, i don't know what is that app, if you don't understand the language too just let it and don't install it and back to the Root Dashi app (the ongoing root process).
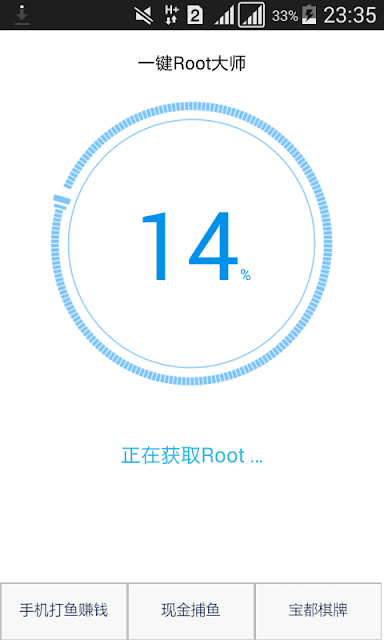
    root dashi rooting android on progress
    (Rooting process is ongoing)

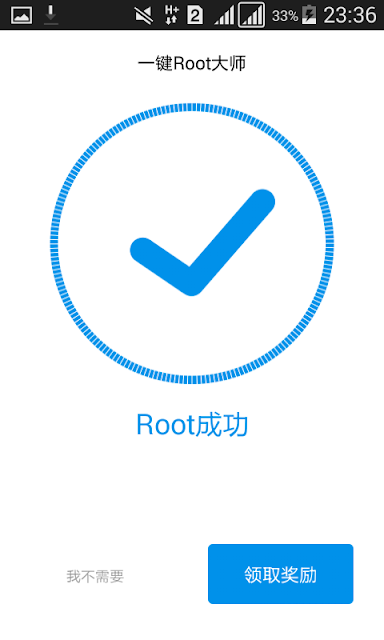
    root dashi root android success
    (Root success)
  4. If the root is failed, there will appear a red alien :v (if i not wrong), try to repeat the root process because I did success the root with this app at the second time. If you failed many times say like more than five times, then maybe this app is not suitable yet with your Smartphone type / it's Android version.
  5. If the rooting process without pc with this app is success, it will automatically appear app named "King Root" on our application drawer that is functioned as superuser management.
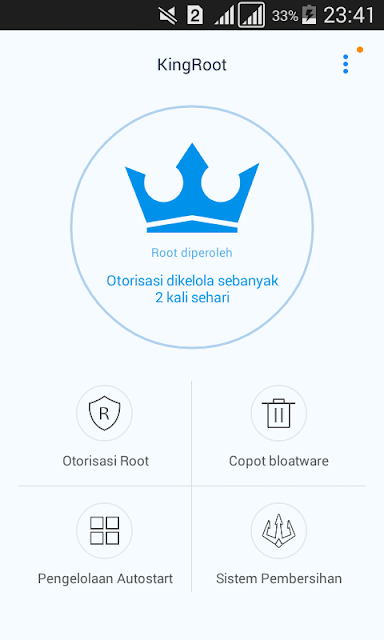
    king root superuser after root dashi success
    (King Root application as superuser management)

Root Dashi APK android application download link


-> ROOT DASHI v. 5.1.6.apk (+- 8.3 MB)


How to root your Android without PC / computer with 360 Super Root app

How to Install CWM custom recovery mode without PC / c

Root Android Kitkat 4.4.2 Without PC or Computer Samsung Galaxy V SM-G313HZ

Finally i found the way how to root my Samsung Galaxy V SM-G313HZ (android kitkat 4.4.2) without PC / computer and it's work! There is so many tutorial to root Android but a lot require PC / computer to do that, and also many guide to root android using application like framaroot, kingoroot, etc, but after i test it it's not working on my Samsung Galaxy V SM-G313HZ.

Steps to root android kitkat 4.4.2 using 360 root apk android application (tested on Samsung Galaxy V SM-G313HZ)

  1. First, we need to download the 360 Super Root v 6.6.2.apk application, then install it.
  2. Turn on your internet connection, if your on mobile data make sure the data signal is at least at 3G or H+, prepare your battery power at higher than 50% (to keep unwanted things not happen), and internet data quota at least 10 MB if you on mobile data (because I don't know how much exactly the data required).
  3. Open 360 Super Root app, after we open it for the first time there will be an introduction menu (lets pass this since it's written in Chinese), keep swipe to the left until it go trough the main interface.
  4. Then we will see big round white button with chinese fonts, under it there will be "root" text, tap it to start the rooting process.

    (Tap the big round white button to start rooting your device)

    (Root process is running, wait till finish)

    Just wait a while and the big white round button will change like following image (numbers appear), maybe the big white round button now change it's function to a RAM cleaner. Congratulations! Now your android smartphone device is in rooted state.

    (Numbers appear, rooting process success)


If after no. 4 process the round is not change and just appear a pop-up like following image, try to restart / reboot smartphone, then open again the 360 Root app and see if the white round button change and appear numbers like image above, if not then the rooting process is failed and try to restart the steps above. Note: If you fail many times like more than 5 times, then maybe this app is not suitable yet for your Smartphone or it's Android version.

(Tap the green button, then restart)

We also can download and install Root Checker.apk Android Application to see more detailed on our android device root status (just remember to give the app superuser access rights, like following image).

When an application ask a system access permission, then there will be a pop up from 360 Super Root app just like following screenshot, tap the left white button to give it a superuser access rights.

(Tap the left white button to give the app a superuser access rights)

One more thing, if the rooting process success, 360 root app will automatically add 2 shortcut icon to our launcher homepage (if there is still empty space in our launcher homepage), the one is just like same to open the 360 Super Root app and the other one is a shorcut to superuser management with lock icon.

Note: The unlock "Developer Option" in your android smartphone maybe can be one of caused the fail rooting process. So if possible try to do a factory reset / wipe data first if you have unlock the Developer Option.

360 Super Root v 6.6.2.apk

Root Checker v 5.6.1.apk

PHH Superuser - Alternative Open Source Rooting Method for Android

"PHH Superuser is the new player on the Android superuser / supersu app management. I am pretty confident this is a trusted supersu management because the project is open sourced. PHH Supersu is a modification / tweak from the open source Superuser project by Koushik Dutta (Clockworkmod) . PHH Superuser is created in hope to works on more device than Superuser can reach."

Root is mode on Android device where the system is unlocked and opened for modification. It can unlock the full potentiall of an Android device. On modern Android device like today, we must have some method to controll the powerfull potentiall of root so application that demand for root access is not harm the device system.

By using a superuser application, all apps that demand for root access must have been granted the permission first from the superuser app. And that method is by using superuser managements application to controll the root, and one of the newest is PHH Superuser. "PHH" is taken from its founder name, Pierre-Hugues Husson.

I think PHH Superuser is rooting Android device using "systemless" method. I can figure it because every I boot my Android device from TWRP recovery, it always says "device not rooted". In fact, the root is exist and all of my root application is working well.

If you love the Clockworkmod app and have tried the Clockworkmod Superuser rooting method did not work on your Android device, then you must try this method. Because the same thing is happened to my Samsung Galaxy V SM-G313HZ stock ROM.

phh superuser main interface

The transfer of Chainfire Supersu ownership to Coding Code make me seek alternative of superuser app


At older post I have share how to root Android using Chainfire SuperSu. That method is the most favorite of Android users, and because it have good root command compatibility make it never fail on giving permission and access to all root application on every Android device.

But since the recent news, Chainfire decide to transfer the ownership of SuperSu to relatively unknown and "shady" corporation who called themself Coding Code Mobile Technology (CCMT). Then I start to questioning the security and integrity of SuperSu, especially to the new owner CCMT.

News spreading, the rumors of folks at Android community is also flying. Who is CCMT? Is they trusted? But all the rumors questioning their integrity just gotten bigger and bigger as why they even do not came out and "show their face" to the Android community to make some clarification and declare their integrity holding such a powerfull root management application called SuperSu.

But CCMT is still just a shady corporation to me now. And I am very care to my security and privacy. That is why also the folks at XDA is start seeking alternative superuser and rooting method, especially the one who declare that he is an open source superuser app. Now, PHH Superuser is my number 1 choice on root management app on my Android phone.

How to root Android device using PHH Superuser


Requirements:

  1. First thing first, if you are trying to replace your old superuser app with this PHH Superuser, you must unroot your device first (the option is usually exist in the superuser app option), so there is no code conflict each other. Or if you are rooting your Android device using systemless root by Chainfire SuperSu before, you must restore your Android device boot img to the original just like before installing it.

    If this is the first time you rooting your Android device, then you can just simply ignore this first step.
  2. Installing zip flashable. Now we will root the device by flashing the Superuser zip file. Just straight boot your Android device into recovery mode, and install the Superuser zip file. After it is done, reboot device.
  3. Now the Android device is rooted, we need to install the PHH Superuser.apk application. You also can find it on Play Store.
  4. Done. Now the PHH Superuser is ready to act as root management app.

PHH Superuser download link


-> PHH Superuser flashable.zip (3.7 MB)

-> PHH Superuser.apk (1 MB)


Read more on the official thread of PHH Superuser on XDA Forum.

How to Enable Root or Superuser Access on Android Devices Running CyanogenMod ROM

Root is the first step when an Android user decide to journey in the Android hacking and tweaking world. By rooting an Android device, we can open the whole system and possibilities become unlimited. One of the most reason why user want to root their Android device is to installing a custom ROM. Now, for you who are using CyanogenMod ROM on your Android device and want a root mode / access, here is the easy steps to unlock the root mode on CyanogenMod ROMs.

manage root access cyanogenmod 13 rom

How to unlock root mode on Android device running CyanogenMod ROMs


  1. To unlock root mode on Android device which running CyanogenMod ROM, we must unlock the "Developer option". Go to "Settings" menu
  2. Scroll down and select "About phone"
  3. Look for "Build number", then tap rapidly on it for about 7 - 10 times. If you're done it right, there should be appear message "you have enabled developer option".

    tap rapidly build number unlock root android cyanogenmod rom
  4. Now back to "Settings" menu, you will see "Developer option" option, choose it.

    select developer option unlock root android cyanogenmod rom
  5. Scroll down slowly to find "Root Access", tap it. Then choose / select "Apps and ADB".

    select root access unlock root android cyanogenmod rom

    choose apps and adb unlock root android cyanogenmod rom
  6. Done! From now on if you run an application that asking for superuser permission, it will appear menu where you can grant or deny it's superuser permission request.

Install Supersu [Chainfire] via CWM Recovery (Update Binary + Root) Android

Allright, before i have show you how to root, and install CWM recovery for our Android smartphone without PC. But i suggest you to replace the old supersu management app with more reliable and the mastermind behind supersu itself, it is with Supersu by Chainfire. I suggest you to replace your Android smartphone supersu management with Supersu by Chainfire because it is more reliable, more RAM will be saved, and it is had more language support (not like 360 root and Root Dashi / King root that had Chinese basic).

Besides, this tutorial is also to root your android smartphone for you who have installed CWM custom recovery via PC / Computer.

What we need :

* Already installed CWM custom recovery. If you have not, then you can read How to Install CWM recovery without PC / Computer.

* A zip file of CWM-Supersu v 1.9.4.zip


Steps install Supersu [Chainfire] via CWM


1. For you who had installed another supersu app like 360 Super Root, Root Dashi / King Root, and etc, you must delete the apps first.

2. Download file CWM-Supersu v 1.9.4.zip, place it in external sdcard.

3. Go to recovery mode. Turn off your android smartphone, then simultaneously press and hold the volume up+power+home button for about 5 second.

4. Now you are in recovery mode, choose "Install zip" --> "install zip from sdcard" --> find where you save the CWM-supersu zip file and choose it --> "...yes..." --> Go back and reboot your Android smartphone.

After the installation success, we can update the supersu and the binary by downloading Supersu [Chainfire] at the app market. When we open the updated Chainfire Supersu for the first time as it ask to update the binary, we can choose with "..CWM/TWRP..." (but via "Normal" too sometimes work for me). Then if we update the root binary of our Android smartphone, it will be more suitable for every new update of root-needed applications.

-> CWM-SUPERSU V 1.9.4.ZIP

-> How to Install CWM custom recovery without PC / Computer

7 Reasons That Will Make You Want to Root Your Not Rooted Android Device

Android, the open source project mobile system operation is have fast progress in it's development. But there is one thing cannot be separated from Android OS is it the old Android version or even to the most new Android N Nougat, and it is ROOT.

As we know Android is an open source operating system, so we have rights to modify the system as we like. By Rooting our Android device is the way we can unlock "the security seal" of the device so we can through the deep of the system. Actually for honest, Root is something that every user should not do so easy to his device. As for a rooted device can also bring user some serious trouble like bricking it, to the most important things like security and privacy of the user.

rooted android break chain

Also although Root is something that can void the warranty of an Android device, but still most user will do it anyway as there is so many benefits and advantages they get. But nowaday there is so many information we can get on websites tell us how to Root our Android device easily, and even there is solution to prevent if something bad happen when we did a failed Root.

My myself start Rooting my first Android smartphone Samsung Galaxy V SM-G313HZ when it still 3 months old in my hand. You know what is the first reason why I brace myself to rooted my Android smartphone at that time? To get internet access for free (oopss...) :D.

Now here it is, the 7 reasons that will make a user to root his Android device.

  1. Performance and Function Tweak


    When I just got my first Android smartphone, I'm very happy with it. The first game i was hunting is Final Fantasy III, then I playing it and "awesome". Then i knew that GTA game is also playable on Android, but with size 2 GB, but my phone storage is just 2 GB :( . But there is solutions to trick it, move the data and obb of game to external SD card (which usually have great space like 8 GB, 16 GB, 32 GB, etc...) using some applications like Foldermount or some Xposed module like XinternalSD. And guess what? That's right, the applications is need ROOT :D.

    Also with Rooting your Android device, we can do many things to boost the device performance. There is many ways we can improve the performance of our device like removing unnecessarry bloatware (system applications), using some Init.d scripts, applying tweak to the RAM, and many more.
  2. Better Gaming Experience


    Playing game on Android device is also had many variations too. From Playing the usual Android game to playing some old school games like Playstation Portable using emulator application. One more reason to root your Android device for you who are gaming freak, to get more performance on the game and maximize your gaming experience.

    final fantasy iv the after years android game ceodore vs boss

    Let me give you a hints about the best Android application to maximize your gaming experience, and it is GLTools. By using GLtools application, you can enchant the graphic or even reduce lag and quality so you can play hind end game on an low end Android phone.
  3. Change Display and User Interface


    One the most reason why users root his Android device, it is to change the display and User Interface (UI). Yeah, we can change the color, the statu bar icon like clock, battery, change the Settings background with your girlfriend photo, or even fake the signal to 4G even you use a 3G phone :D.

    There is also many ways to do it, and one of the most popular method is using Xposed module as it is fairly easy to use and not too risky. Some popular Xposed module to modify the User Interface: Wanam Xposed (mainly for Samsung Touchwiz Kitkat), Xblast Tool (for Kitkat and down), or GravityBox (available for Android Jelly Bean to Marshmallow).
  4. Stay Up to Date


    Every Android device of course will get system update from the device Vendor. The update can include of Android OS version or even small updates to fix some minor bugs. But I'm sure an Android device will soon stop getting the official updates as more and more new device released. If we want, we also can take an act to update the system or OS version by ourself.

    Like my Samsung Galaxy V Android smartphone, now i'm running it with Android Marshmallow which originally released as Android Kitkat, although it never get official update from the manufacturer. To do that, I am installing an aftermarket firmware created by third party (non-official) and flash it by myself. It is often called installing a "Custom ROM".
  5. Change ROM


    Like I said above, by Installing a custom firmware or custom ROM (the right one of course...) we can update the OS version. But just not that, by Installing custom ROM is like a total modification also to the Display, performance, new features, and many more.

    custom roms on android

    To install a custom ROM, we need a custom recovery. And root is the only way if we want to install a custom recovery directly and using it by our Android device.
  6. Backup and Restore


    Now this also one more things that pretty important, to easily backup and restore of our Android device content. Actually Google also has offer you a service to backup your device to the Google Drive cloud. But it needs a lot of time and bandwith of course.

    If we have a rooted Android device, we can easily backup it's whole content from the applications, system, the apk's and anythings directly to our external storage, so no computer needed. There are many apps on the market that offer to do that, example the best is Titanium Backup and Helium.

    Or even we can make a full backup of our Android device content and system using the Backup feature on custom recovery like TWRP, CWM, etc as easy as "one tap".
  7. Hack 2 Free and Hack 2 Win :D


    Last but not least, is a bad reasons that is we can get premium / paid Android app or game for free. Or just hack an in-app-purchase of an application or game to get some premium features for free. It need some hacking jobs and some right tools like Lucky Patcher, which need root access of course.


    And also we can hack an Android game like the money, the gold, similar like that if we have root access because the system is already unlocked so we can make changes to everythings.

Like I said earlier, rooting your Android device is something you must think twice before to do it. As we get many benefits, a rooted Android device is also could bring us some trouble including bricking it or some serious trouble about your privacy and security.

I think rooting our Android device is ok if we know what app and what kind of jobs the root application will do to our Android device. And choosing the rights Superuser management app is also an important thing so you can keep your privacy and security safe.

How to Accelerate Your Android Device

How to Accelerate Your Android Device

Android phones now exist almost everywhere ranging from low specifications to very sophisticated. Over time, each phone will be slower; This is why you must maintain the smoothness of the phone with a few simple steps in this article.
  1. Reset your phone. Arrange reinstall everything and restore your phone as before, which is "like new". This is a temporary choice, because when re-used phones will start to slow down again as usual. Back up contacts, memos, and other important information (such as passwords stored in the browser) before doing this step.
  2. Look internal memory space. The low internal memory could cause severe delays on the phone. Move media (images, mp3 files, video, etc.) to external memory such as SD cards. Some low- and moderate-specification mobile phones typically have a low internal memory, so move your files to the SD card will not help much.
  3. Root your phone. Root means giving more authority to the phone. Despite the risks of rooting, but the risk is not as big as before. Root process that failed to make the brick phones (eg malfunction). In addition, to root the phone will void the warranty. However, you can do unroot the phone (and cell phone warranty returns, because manufacturers cannot know if your phone is ever to be rooted before). Here is a list of things you can do after rooting your phone:
a.       Overclock the processor phones. This will ultimately speed up the phone but will consume more battery than before.
b.      Installing a special ROM. ROM is basically an Android version installed in the phone. Special ROM ROM is not official, but as part of a special ROM works better than the official ROM itself. Special ROM can solve many problems, including slowness and update the version of Android, but the solution is very technical, risky and not recommended, due to special ROM sometimes unstable, contain or eliminate damage to the official ROM features.
c.       Removing unwanted default application. Before you delete some applications, consider the following two points:
d.      Download the backup application, such as Titanium Backup to back up the application before deleting (just in case if you want to restore).
e.       Do not let you remove system applications, such as the launcher or the status bar.
f.       Perform root also gives you access to more technical applications, such as root call blockers, normal and notification ads blockers and root memory managers. Root memory manager is usually better than the auto task killer app.

5 Best File Manager or Explorer Applications For Your Android Device

File Manager is an inseparable application on every Android smartphones / devices. The huge numbers of directory, folders, and files, have made a need of a powerfull and easy user interface file manager app is a must have on every Android devices. Yeah for me, i even never spend a day on my Android smartphone without opening a file manager application.

In my opinion, a best file manager is not only provide the basic feature such as file operating (read, move, copy), but also must had a root explorer or system directory explorer to accomodate the needs of root users, an archived file reader, and a media player so users can extract / handle simple archived files and play multimedia files without need to open different app. And maybe, it is had one feature that won't found on every file manager applications that make the file manager app is unique.

You will find many file manager applications on the Android market (and maybe non-market source like XDA). But I can recommend you from the best of file manager Android app in my opinion of course. Here it is, in no sorted numbers, the 5 Best File Manager Android Applications version indophoneboy.blogspot.com.

  1. FX File Explorer (by "NextApp, Inc.")


    The FX File Explorer is my regullar used file manager application on my Android phone. The simple and easy user interface makes files exploring and operating become very fast and efficient. Don't tricked by the simple user interface, if you explore all the FX File Manager app feature, you will find many great and usefull option and features such as theme editor, shell script executor, text and binary editor, multiwindow, etc.

    What I like from FX File Explorer is their easy to navigate user interface that make file operation is so efficient. You can also tweak the theme like change the main color or set your own image as background. And most great, it has no ads.

    FX includes a number of built-in editing/viewing applets:

    • Text Editor (with undo/redo history, cut/paste, search, and pinch-to-zoom)
    • Binary (Hex) Viewer
    • Image Viewer
    • Media Player and pop-up Audio Player
    • Zip, Tar, GZip, Bzip2, 7zip archive creators and extractors
    • RAR file extractor
    • Shell Script Executor

    fx file manager android application main user interface

    Optionally, you can download the FX ROOT addon to add root functionality and purchase FX PLUS addon on the Playstore to unlock the premium feature such as media manager, cloud connection, and many more.

    -> Download FX File Explorer v. 5.1.0.27.apk (8.9 MB)
    -> [Addon] FX Root Addon v. 1.0.2.apk (27 kB)
  2. MixPlorer (by "HootanParsa")


    Now we have very cool and amazing file manager called MixPlorer, abbreviated from Mix Explorer. I'm sure you will find no match file manager out there if it compared to the feature and function of MixPlorer. This app is developed by indie developer at the XDA, and it's ad free too :) . I was first know this file manager when it was embedded in one of my Android phone custom ROM.

    Features:

    • Easily themable with customization option which lets you select any color you like.
    • Sort, disable and enable all menu options and action buttons.
    • Unlimited Tabbed browsing and Dual panel in landscape mode and Drag and Drop between panels also supported.
    • Easily create Tasks to multitask Copy, Move, ... operations.
    • Different various View Modes and Sorting Options for each folder separately!
    • Customizable bookmarks drawer with essential file types already categorized.
    • Advanced search functions.
    • Custom USB OTG driver. FAT32 (R/W), exFat(R/W), NTFS (R).
    • Html viewer which supports MHT, Markdown, AXml and ....
    • eBook reader which supports PDF, Epub, Xps, Cbz and multipage Tiff images.
    • Export/Import all preferences and bookmarks and customized skins.
    • Extract and create 7z and Zip/Zip64 (splitted-encrypted), TAR, TAR.GZ, TAR.BZ2, GZIP, BZIP2
    • Extract RAR/RAR5 (splitted-encrypted), XZ, APM, CAB, ISO, ARJ, AR, LZH, LHA, CHM, MSI, WIM, Z, CPIO, RPM, DEB, NSIS, LZMA, NTFS, FAT, VHD, MBR, SWM, MSLZ, CramFS, Dmg, ELF, MachO, Mub, PE, Split, Xar, Z, Udf, HFS, SquashFS, PPMD.
    • All your cloud storage needs accessible from one single app. Choose from 20 providers: Amazon CloudDrive, Mega.co.nz, Mail.ru, Dropbox, Box, Yandex, HiDrive, Baidu, Mediafire, Kuaipan, Kanbox, IDrive, Hubic, 4Sync, Google Drive, Meo, OneDrive, pCloud, SugarSync, VDisk.
    • + clouds which support webdav like (Yandex.ru, OwnCloud, MyDrive.ch, DriveHQ, CloudMe, CloudSafe, ...).
    • Modifying zip files.
    • Root access for all advanced operations.
    • User and System app management with data backup ability for rooted devices.
    • EncFS volumes supported for all storages.
    • File encryption and decryption using Aescrypt file format.
    • FTP/HTTP Server built in + TCP server to receive files from other devices using MiX (Send-to option).
    • MP3 Tag Editor.
    • Built-in Image Viewer (it supports GIF animation and large images).
    • Built-in Media Player + VLC codecs add-on.
    • Powerful Text Editor.
    • SAMBA, FTP, SFTP, WEBDAV, BLUETOOTH supported as well.
    ••• And many more awesome features for you to explore!

    mixplorer file manager android application screenshot

    The functionality, rich feature, and it also have powerfull theme engine / selector make MixPlorer the best file explorer / manager on the Android platform. You can also download and install addons to unlock more function from it. Visit the official thread on XDA to stay up to date to MixPlorer Android application.

    -> Read more info about MiXplorer file manager Android app
  3. ES File Explorer File Manager (by "ES Global")


    For the third entry, there is we have ES File Explorer File Manager. ES File Explorer is another great and complete file manager for Android devices. It proved its popularity with million of users installment.

    Features:

    • Sender: Transfer apps, images, music, movies, documents, without using mobile data and cables.
    • Built-in viewers and players for various file types.
    • Built-in ZIP and RAR support.
    • Cloud Storage.
    • Remote File Manager.
    • Functions as an FTP and WebDAV client.
    • Access your home PC: Through your smartphone via WiFi with SMB.
    • Root Explorer.
    • Bluetooth file browser.
    • Wi-Fi File transfer: Use your PC to wirelessly edit your mobile files using FTP.
    • App Manager.
    • SD Card Analyst.
    • Kill tasks with a single click.
    • Cache Cleaner and Auto-start Manager.

    es file explorer android application screenshot

    Actually ES File Explorer is the first ever file manager application that I downloaded when I just got my Android smartphone. Unfortunately that ES File Manager is ad supported, which means you will see ads when using it. The premium / paid version of this app is available on the Playstore.

    -> Download ES File Explorer File Manager v. 4.1.3.1.apk (8.9 MB)
  4. X-plore File Manager (by "Lonely Cat Games")


    Now we have another unique file manager with it's dual-panel file manager view, it is X-plore File Manager. Yep, this file manager app is have unique with it's appearance with the dual-panel tree view. Remind us like file managers on the computer.

    Features:

    • Dual-pane tree view
    • Root, FTP, SMB, Sqlite, Zip, Rar, 7zip, DLNA/UPnP explorer
    • Disk Map - see which files consume most space on your disk
    • Cloud storage access: Google Drive™, Dropbox, Box.net, Amazon cloud drive, Mega.co.nz, OneDrive, Webdav, ОБЛАКО.mail.ru, Yandex.disk, MediaFire, SugarSync, Dump Truck, Picasa
    • SSH File Transfer (SFTP) and SSH Shell ***
    • Music player ***
    • App manager
    • USB OTG
    • PDF viewer (on Android 5.0+)
    • WiFi file sharing ***
    • Manage files from a PC web browser ***
    • Favorite folders
    • Built-in viewers for images, video, audio, text
    • Hex viewer
    • Fast Image viewer with zoom and slide to previous/next images
    • View APK files as ZIP
    • Share - send files by Bluetooth, email, or whatever the device supports, from any location
    • Configurable buttons and key shortcuts
    • Seamless work with Zip

    x-plore file manager android application screenshot

    Besides from looks, X-plore File Manager Android application is also have advanced features like root explorer, clouds, different connection mode to another device, theme tweaking, and many more. However, some *** marked feature are unlocked only through the in-app purchase. This app is available on the Playstore.

    -> Download X-plore File Manager v. 3.88.02.apk (5 MB)
  5. MK Explorer (File Manager) (by "kormateusz")


    "MK Explorer is another simple file manager". For the last entry, we have a very simple yet great file manager that is MK Explorer (File manager). The simple and easy to use user interface with material design, make this file manager is pleasants to use on every Android users and on every Android devices. The app is available on the Playstore.

    mk explorer file manager android application screenshot

    Features:

    • Material Design
    • Of course: delete, copy, paste, and move
    • Two windows (panels) to view files
    • Shortcuts on the desktop directly from the main application
    • Keyboard Shortcuts
    • Search engine for files
    • Thumbnails of images, videos and APK files
    • Extracting ZIP and RAR archives
    • Compression to ZIP
    • Root access
    • Android 5+ SD Card support
    • Adapted to smartphones, tablets 7 and 10 inch
    • Built-in gallery
    • Built-in text editor
    • Built-in music player
    • Supports 20 languages

    -> Download MK Explorer (File Manager) v. 2.5.4.apk (3.7 MB)

That's it all the 5 Best File Manager Application for Android devices... Whew.. tiring post :D. There is hundreds or maybe thousands file manager / explorer app on Android platform, but because the limited of my experience and knowledge so I just filter it the top 5 for you :v .

If you feel you have more experience and knowledge, then maybe you can tell me what is the best file manager applications for Android devices...

What is Root on Android and The Benefits

Rooting your Android smartphone is just like we "change" the system to get the full access on our android smartphone, even to the most little system part will become visible and accessible to be modified. Rooting your android smartphone can be worked by the help of PC (Computer), via recovery mode, or as easy like "one click" with the help of Android Application.

And meanwhile Unroot is a process to removing the Root access to turn back the system to original. People unroot his android smartphone often because the negative effect of rooting like we can not receive update On The Air (OTA) from the official smartphone developer, many application force close, few bugs, and other.

In the past, rooting your android device is said to be illegal. But now everyone can rooting their android device. Although there are many benefits of rooting our Android smartphone, but we better think twice before doing that, moreover if we still not bored yet with our android smartphone and we have not very good yet in using it, because rooting your Android will void / losing your warranty at your android smartphone.


Example of benefit or advantage from rooted Android device / smartphone


* My Samsung Galaxy V (Android Kitkat 4.4.2) can not do "write" operation (make file / folder, extract, moved to, etc) in external sdcard, except by system application, as it is one of limitation in Android Kitkat. But after I rooting it, so the system will become accessible to modify. I can solve the limitation can not write at external sdcard, by modifying some little part of code at the system of my Samsung Galaxy V, and voila! Problem solved.

* With rooted device we can delete the bloatware or the default system application that we don't need, so we can save the internal storage space or even save more RAM.

* Moving applications or game from internal storage to our external memory to save more internal memory space, even if the application does not support to be moved by the default.

* If we can modify the system, so we can change the appearance of our android smartphone. We can change the background system color, text, inserting image, or change the user interface.

* Boost performance and increase the usage value of our android smartphone, because some of cool application can only be run in rooted android device.


It's sooo... many benefit and advantage on a rooted android device, but remember "As well as great power, comes great responsibility". It is safe to root our android smartphone (i have prove that by doing root and unroot many times) as long as we stick to the instruction and procedure. But at the same time we also must be more carefull, because after rooting our android device the system is become more "opened".

What is Init.d and How to Enable It on Your Android Device

Universal Init.d is an application to make init.d feature on Android to running some script, and then it can execute the script automatically every time we boot / restart our Android device. In other words, it can help us applying init.d script without need to be manual executed by the us everytime we boot / restart the device.

What is init.d script on Android and how should i care about it?


Init.d Script is like a bunch of text containing command for the Android system to be executed. There are many benefits using init.d script, depend on the init.d script itself of course. But mainly, user placing init.d script on their Android device to get better performance from the device like reduce lag, help RAM performance, better graphic and sound, and other many of positive purposes.

The main advantage of using Init.d script of course is to tweak the Android system without need any additional application as the command is send directly to the system.

Universal init.d application can be used on every Android device running any kernel, need rooted device though. After we activate the Universal Init.d, we can place the init.d script we want to execute every boot on directory /system/etc/init.d/.

The best place to find Init.d scripts is on XDA forums. You can search init.d script that shared and created by the members which suits your need to tweak your Android device there.

universal init.d android application main user interface

Why Init.d is not activated on my Android device (the init.d script is not running / affect) after enabled the Universal Init.d?


Remember Universal Init.d is need root permission to execute the script everytime you boot the device.

If it is the first time you open / install the Universal Init.d app, make sure the switch is in "on". Then you will see two come-from-nowhere init.d script. Tap the one named "00banner", then tap the three dot icon on top and tap "Execute", now Universal Init.d will asking root permission and be sure to give it. Now then the root permission is gained, you can start placing the script on /system/etc/init.d/, and it will executed automatically everytime you boot your Android device (there will be delay 1 - 2 minutes after booting complete for the init.d script to be executed).

Best practice when applying / adding init.d scripts on your Android device


If you start using an init.d script and later you find it very usefull on your Android device, i'm sure you will also start to seek for more better scripts you think will greater than your old installed one. But one behaviour on init.d script if you use more than one script at a time, is they may will get conflict each other if the script command is same.

Say you installed two init.d script. Script A is for increasing RAM performance, and Script B is tweaking whole system and RAM performance is also one of the function. You be better remove the script A first, before placing the script B. Because there are same function that will run same command on both two script that is RAM performance tweak, it will get conflict each other and who know which one will affect the RAM performance on the system it is script A or script B.

So, best practice on using / applying init.d script on your Android device is use single script. By use only one init.d script, it will avoid scripts conflict each other and you can compare the script effectiveness from one script to another.

Universal Init.d APK Android application download link


-> UNIVERSAL INIT.D.apk (855 kB)


This Android application is available on the Play Store. Rate it and give it nice comment if you find it usefull.

What is ODEX, deODEX, and The Benefits on Android

For us who like to modding our Android device must be often hear about "ODEX" and "deODEXed". So what is that things? And why there must be two DEX type? Actually this is myself question :v .

Quoted from stackoverflow.com:

Applications are basically glorified ZIP archives. The java code is stored in a file called classes.dex and this file is parsed by the Dalvik JVM and a cache of the processed classes.dex file is stored in the phone's Dalvik cache.

An odex is basically a pre-processed version of an application's classes.dex that is execution-ready for Dalvik. When an application is odexed, the classes.dex is removed from the APK archive and it does not write anything to the Dalvik cache. An application that is not odexed ends up with 2 copies of the classes.dex file - the packaged one in the APK, and the processed one in the Dalvik cache. It also takes a little longer to launch the first time since Dalvik has to extract and process the classes.dex file.

If you are building or choosing a custom ROM, it's a really good idea to odex both your framework JAR files and the stock apps in order to maximize the internal storage space for user-installed apps. If you want to theming it, then simply deodex -> apply your theme -> reodex -> release.


DEX stands for "Dalvik EXecutable", so ODEX will be " Optimized Dalvik EXecutable". As it says, ODEX is an optimized one from the app apk dex file so the system will more easier and faster to read and execute the application information.

The way to know which one our ROM classified to is pretty simple, just use an application that can explore the root directory (like ES File Explorer or Root explorer), and go to directory /system/app. If we found inside the directory two same application name with different extension (example: gmail.apk and gmail.odex) so our Android ROM is on ODEX. If not found any odex file inside the directory, then our ROM must be deODEXed.


ODEX on Android


ODEX ROM oftenly we will find it on stock ROM, the default ROM that created by device manufacturer. ODEX ROM will save more phone storage (internal memory) because the system apk app DEX (ODEX) files will moved to /system

ODEX ROM has advantages:
- More safe and stable, because not easy to be changed / modified
- More free space on internal memory

deODEXed on Android


Different with another one, deODEXed ROM will oftenly be found on stock ROM (3rd party created ROM). Say for ROMs for my Samsung Galaxy V, the developers of the custom ROMs make its all deODEXed (except CM11). It will use more space on internal memory, but saves more on system storage.

deODEXed ROM has advantages:
- Easier to mod / theming it (it's good for you who like to change the theme like icon, systemUI, colors, etc)
- More free space on /system directory.


How about speed and RAM problem

From what i read, many says that ODEX ROM is faster than deODEXed, moreover from booting time. But from what i feel in my Samsung Galaxy V Android, the two is just the same. It is true need a longer booting time in a deODEXed ROM, but it just happen one time when the ROM is first booting (just after i install the deODEXed custom ROM)

If see from RAM problem, yes i feel the ODEX ROM has more empty RAM space. But the different is not very great, maybe the RAM is just 10% more empty from deODEXed one. Because the RAM or speed is basically up to the user how he treat his Android device and the size of application that installed on the device.

Reducing Lag on Your Android Smartphone with Seeder APK

One of problem we often facing in Android smartphone is Lagging. Lag (taking longer time from it should) when open and using application and then back to homescreen. But one of member from XDA forum nicknamed lambgx02@XDA had made an application that can help reduce the lags on our Android device called SEEDER.

Quoted from the developer:

"Many Android tasks run slower than they should for one simple, yet not-so-obvious reason: they consume large amounts of random data from a limited source. Random data is used to generate session keys and unique identifiers, in SSL and wifi, while starting processes, and during inter-process communication.

This data (entropy) runs out frequently, and that causes processes reading from the blocking device (if any) to temporarily stop responding (lag). These processes cannot continue until the Linux kernel repopulates the entropy pool, which takes time. In addition, input events are pulled from the user interface (to refill the pool), which may also contribute to the problem.

Seeder is a service for root users. It assists the kernel in "topping off" the entropy pool by re-seeding it with data from the non-blocking (high performance) random device. Optionally, it can also help alleviate MMC I/O contention by extending the I/O queue, allowing the I/O scheduler to make better decisions, and combine more writes."


Requirements:
- Rooted Android device.


Now after you install Seeder app, open it and don't forget to give it root access if asked. Make sure the "Enable....." option is checked to activate the seeder. You can adjust the performance by selecting mode from "Light" to "Agressive". The bigger the performance set may cause the bigger battery usage, moreover if option "Suspend when the screen off" is disabled (although maybe this option can cause rebooting your Android device in some user case).

Seeder apk android application version history download link


# SEEDER v. 2.0.0.apk

Backup All Your Android Games and Applications to Your SD Card Using Titanium Backup APK

Do you like to change your Android device ROM? Or need to uninstall an application because you want try a new application or game because running out of space? Then Titanium Backup apk Android application is a must have Android application for you.

On the older post, I had share about the same kind backup application using Helium application APK. But i didn't satisfied with it because there are some application and game which failed to backed up by Helium. Read: How to Backup Android Phone Applications and Games Data using Helium APK.

Titanium Backup APK Android application is became "the ultimate root app" since several years ago. The main feature is we can backup our installed Android application and game APK and the data directly to phone storage or external SD card. It is very good especially if your phone does not have backup feature (i read there is some Sony phones which disabled backup feature).

Hey is backup Application is one of standard feature in Google Service which exist on the Android phone? That's right, but it need to upload the application's data to the Google server which will cost you time, energy (battery), and even money if you use it through mobile network. And moreover, if you uninstall the Android application or game then you need to re-download it first from Play Store before you can restore / download the Android application data.

Titanium Backup APK Android application can backup every Android application and game directly to phone storage or external SD card, we can change where the backup should be saved in the preferences. The advantage, that Titanium Backup also will backup the .apk file of the Android app or game. So we can restore the backed up Android application or game exactly just like when we backed it up from save data, setting, even to the smallest part will be backed up.

titanium backup android application main interface

titanium backup android application game list

Titanium Backup APK Android application features


Just like I said above, backup Android application and game is just the main feature of Titanium Backup APK. There are dozens other features from this Android application like:
  • Uninstall bloatware (system application)
  • If we have updating an Android Application or game and we had backed up the older version, we can downgrade the application.
  • Backup and restore phone important data like browser bookmarks, phone, sms, etc to and from a .xml file.
  • Integrate system application update to ROM so it can conserve more free storage in your phone.
  • Extract and restore application from a nandroid backup.
  • And many more...
Of course all that flashy features need a ROOT present on your Android device. And also some additional feature can be unlocked by purchase the Titanium Backup Pro addon on the Play Store.

Titanium Backup APK Android application download link


Samsung Sans Font Pack APK (+ 500 Types) for Samsung Galaxy Android Phones

Allright, now here is the font pack i used back months ago when I still use the stock / Touchwiz ROM on my Samsung Galaxy V SM-G313HZ. It contain more than 500 font types. It will replace the Samsung Sans.apk that located in the system/app/.

Ahhh... I still remember the days, when i was a very noob on Android and want to change font on my Samsung Galaxy V. I'm looking into Google and find lot of font pack for Samsung phone. But after i install it and wanted to change it, it just say "Font Not Supported...", and it just keep made me redirect to Samsung Market to buy just for a font! The Google Playstore had the font and it works, but all the font is separated one by one as different app and all the fonts models is sucks -_- . And so, i start to know about the XDA Forum, and the story begins :) ...

This font pack may and may only work on like Samsung Touchwiz Kitkat ROM's and Touchwiz Kitkat based ROM's like Zentouch, Palents, etc. Because what? Because it need a present of a system flipfont font changer in the settings menu to change the font. And custom firmware like CyanogenMod's does not have it.

Requirements:
- Rooted.
- A file manager with root explorer ability like FX, ES File Explorer, etc...
- SAMSUNG SANS Modded + 500 fonts.apk (69.5 MB)


Steps to Install the Samsung Sans.apk modded with +500 font type


  1. Using any file manager / root explorer, go through the directory /system/app/, and then move or cut the "samsungsans.apk", if you're ROM is on ODEX, move also the "samsungsans.odex". Keep the files somewhere as you're backup. Then reboot you're phone.
  2. After reboot, just install the SamsungSans Modded.apk.
  3. To change the font is just like usual, go to "Settings" -> "Display" -> "Font Styles". Note: Because the font is so many, maybe it will take a while before it completely showed.
  4. Done!


Thanks to a member of XDA Forum, which i forgot the nick and the link, really sorry :(.

Bring Up Menu Button on Android Device with Physical Button Running AOSP Based ROM

It's all begin when i changed my Samsung Galaxy V phone ROM to CyanogenMod 11 (Kitkat AOSP based ROM), I then found some issue finding a menu button in some application that gone missing. I got these "missing menu button" on some application like Firefox, Titanium Backup, Catlog, ePSXe emulator, etc.

What is menu button? Menu button is a three dot / three line icon (or using "Menu" text instead) usually placed on top of application user interface. It is used to access the main Menu preferences.

titanium backup menu button appears
Menu button appears

titanium backup menu button missing
Menu button gone

On ePSXe emulator, the menu is used to access the main options like cheats, graphic setting, and other quick preferences. The menu is can be accessed by pressing "back" key when I was using stock Touchwiz ROM of my Samsung Galaxy V phone. But after I changed my phone ROM to CyanogenMod 11 suddenly the "back" key changed to exit menu on the ePSXe emulator application. This also then became an issue when I was using some application like Firefox Browser, Titanium Backup, Catlog app, I can't found the menu button in the app!

What caused the menu button missing on applications on Android Kitkat AOSP ROM


The problem may occur because the differences designs of Samsung Touchwiz Android smartphone and AOSP based ROM. The Samsung Android smartphone which using Touchwiz as the stock ROM is designed with psysical / hardware keys button where it replaced the soft navigation keys (navigation bar).

On an Android device using soft navigation keys, the three dot / three line icons menu button appears beside the main navigation keys when it needed. But Samsung has modified the default by removed the soft navigation keys (navigation bar) and then move it to outside the screen as psysical (hardware) button.

android homescreen with navigation bar soft keys
Screenshot of navigation bar / soft navigation keys

And I think there are some Android application developer prefer to use this method, where it detect a Samsung Touchwiz ROM with psysical navigation keys it will show three dot / three line icon Menu button on the application user interface. But when it detect an Android smartphone with soft navigation keys it will hide the three dot / three line icon Menu button on application user interface, because a menu button already appear beside the soft navigation keys.

So when you change your Samsung (or other manufacturer) device ROM to AOSP based ROM like CyanogenMod, the application which prefer above method will be tricked to think that your device is an AOSP based ROM device with soft navigation keys.

Access the missing menu button on Samsung smartphones running AOSP Android kitkat based ROM like CyanogenMod 11


There are two options to bring menu button if you experiences condition like above on your Android device, it is by mapping menu button as additional keys to existing keys and the second option is by activate the soft navigation keys:

  1. Adding menu button as additional key function to existing keys


    The first option is done by adding additional function (where the additional function is Menu button). This happen when I was using CyanogenMod ROM on my Samsung Galaxy V. Just go to "Settings" -> "Buttons", now choose from the available button, example I choosed using the HOME BUTTON -> "Long press action", then set to "Open / close menu", done! So now we can call the Menu in application by doing long press on the Home button.

    buttons setting menu long press

    If the ROM you using are not give you the Button option on Settings (Buttons option is not exist), there is also another way to map the Menu button as an additional keys to existing keys by using Xposed module like Xposed Additions or Gravity Box. Read: Post about Xposed Additions module or Post about Gravity Box module.
  2. Activate the soft navigation keys (navigation bar)


    Well the second option is to bring up the soft navigation keys itself, which this will make your Android device screen to be cut a little. This can be done by modifying the system build.prop, so a file explorer/file manager with root ability is required.

    Find the build.prop file at root directory /system/. Edit the build.prop file, then search text for qemu.hw.mainkeys line, change the value to 0 so it will become: qemu.hw.mainkeys=0.

    edit build.prop qemu.hw.mainkeys

    If the "qemu.hw.mainkeys=0" is not exist on your build.prop file, then you must add it manually. Copy the:
    qemu.hw.mainkeys=0
    and paste it to the last line of your build.prop. Reboot your device. After reboot go to "Settings" -> "Buttons", scroll down and find NAVIGATION BAR section -> "Buttons and layout", from there you can assign the Menu key to be placed on the soft navigation keys / navigation bar.

    buttons setting menu navigation bar

5 Best Text & Code Editor Applications For Your Android Device

One more application that cannot be separated from my Android smartphones is text editor app. Yeah, i am really do lots of writing work on my Android device. And now you are reading this post right now, did you know that most of this article content is written on an Android smartphones :D . A powerfull text editor application on my Android smartphones is a must have app for a person like me, so i can capture and write the idea immediately anywhere and anytime when the bulb just came out from my head :D .

There is so many text editor app on the Android market. Each of them is have it's own advantages and disadvantages. But here it is my recommendation, the 5 Best Text / Code Editor Application for your Android Device, version indophoneboy.blogspot.com (in no ordered number).

  1. QuickEdit Text Editor (by "Rhythm Software")


    This is the best text or code editor on your Android device if you handle a large file (more than 100 kB). QuickEdit Text Editor can open and read file more than 10.000 lines without lag. It also have different syntax like HTML, Javascript, CSS, C, PHP, and many more.

    Quoted from the developer
    Features:

    • Enhanced notepad application with numerous improvements.
    • Code editor and syntax highlight for 40+ languages (C++, C#, Java, XML, Javascript, Markdown, PHP, Perl, Python, Ruby, Smali, Swift, etc).
    • High performance with no lag, even on large text files (more than 10,000 lines).
    • Easily navigate between multiple open tabs.
    • Show or hide line numbers.
    • Undo and redo changes without limit.
    • Display, increase or decrease line indents.
    • Physical keyboard support, including key combinations.
    • Go directly to any specified line number.
    • Quickly search and replace.
    • Easily input hex color values.
    • Automatically detect charset and encoding.
    • Auto indent for new lines.
    • Various fonts and sizes.
    • Preview HTML, CSS and markdown files.
    • Open files from recently opened or added files collections.
    • Ability to edit system files on rooted devices.
    • Access files from FTP, Google Drive, Dropbox and OneDrive.
    • Support both light and dark theme.
    • Optimized for both phone and tablet.

    quickedit text editor android app screenshot

    I am often use QuickEdit TextEditor to editting or fix error in my Blogger template (as Blogger template xml file is have > 80 kB file size). Whenever i'm notice that something is error or need a fix on my blog, then I can edit the template on the go on my Android device using this app. The premium / paid version of this app is available on the Playstore.

    -> Download QuickEdit Text Editor v. 1.2.2.apk (2.9 MB)
  2. Jota+ (Text Editor) (by "AquaMarine Networks")


    Jota+ (Text Editor) is pretty good text editor too. The plus point from this Android text editor app is it have nice user interface. We can also customize it's UI like adding a background image, etc.

    Quoted from the developer
    Features of Jota+:

    • Support multi-file feature.
    • Support 1 million characters.
    • Support many character codes and Auto-Detect feature.
    • Search/Replace
    • Highlight searching words.
    • Support font customize.
    • Support Install-shortcut feature.
    • Auto save.
    • Show Line numbers.
    • Show Tab/Line-break mark.
    • Count characters/words/lines.
    • Customizable Toolbar.
    • Syntax highlight support many languages.
    • Customizable Fixed Phrase management.
    • Clipboard management.
    • Built in file browser with bookmark management.
    • Free Wallpaper by Non Miyabi. http://sites.google.com/site/nonsillustgallery/
    • Detect file modification.
    • Support physical-keyboard devices.
    • Support Bluetooth Keyboard.
    • Safe app without any evil permission requests.
    • Support many kinds of Cloud Storage Services.
    • Support multi window feature for Samsung devices.

    jotaplus text editor android app screenshot

    There is also additional features like ability to use root mode, unlimited cloud connector, etc. that requires us to download the addon app, and need to buy Jota+ pro key in the Playstore thought.

    -> Download Jota+ (Text Editor) v. 2016.10.apk (6.2 MB)
  3. DroidEdit (free code editor) (by "Andre Restivo")


    Now we have DroidEdit (free code editor) in the third entry. I was using this app when i was very a noob on Android, to edit and write css or html file in my Wap long time ago :v . Yeah, i was a wapper / wapmaster too before now I become a blogger :v .

    Quoted from the developer
    Features:
    • Syntax Highlighting for several languages (C, C++, C#, Java, HTML, CSS, Javascript, Python, Ruby, Lua, LaTeX, SQL, ...)
    • Several color themes
    • Infinite undo & redo
    • Search & replace
    • Auto & block indentation
    • Keep opened files and changes between sessions
    • Open files directly from dropbox or a file manager
    • Character encoding support
    • Keyboard shortcuts (List below)
    • Share documents with other services (dropbox, email, ...)
    • Preview HTML files in browser
    • Bracket matching
    • Go to line
    • Run Scripts in SL4A directly
    • Configurable Shortcuts

    droidedit free code editor android app screenshot

    The plus value of this text / code editor is the simple user interface. Like I said, I was using it when I was a wapper because it simple yet rich syntax option to create or edit some files for webmaster / wapmaster (wapper) jobs. The premium / paid version of this app is available on the Playstore.

    -> Download DroidEdit (free code editor) v. 1.23.1.apk (3.5 MB)
  4. 920 Text Editor (by "Jecelyin Peng")


    In the fourth entry, we have 920 Text Editor. This text editor app for Android device is also an open source program. The simplicity, complete feature, nice user friendly interface, make 920 Text Editor is a worth to be tried on your Androi device. The app is available on the Playstore.

    920 text editor android app screenshot

    Quoted from the developer
    Features:

    • Multi Tab
    • syntax highlighting:ASP, ActionScript, C/C++, C#, Erlang, Frink, HTML/XML/WML, CSS, Javascript, Java, JSP, Perl, PowerShell , PHP, Python, Shell/Bash, Lua, SQL, VB/VBS, Tcl, TeX/LaTeX, Verilog, AutoHotKey, AutoLisp, Pascal, Fortran, ColdFusion, VHDL etc...
    • show line numbers
    • show blank characters (tabs, line breaks)
    • You can also convert the current file encoding
    • easy toolbar
    • list of recently opened files history
    • regular search, replace or replace all
    • change the font and font size
    • “Word wrap” switch
    • lock the screen orientation in: auto, horizontal or vertical
    • remember the last open file
    • hide the soft keyboard, long press the edit area can be turn on
    • long press the “edit area” you can convert selected text to uppercase or lowercase
    • auto indent
    • keep the screen in the awake state
    • you can run at ROOT permissions
    • easy’s file manager, you can delete or rename the file, or open with other application to view, copy/move etc. to manage files
    • use the volume keys to quickly switch the display/hide the toolbar, full-screen mode
    • preview the HTML file
    • Color Picker
    • Dark theme

    -> Download 920 Text Editor v. 2.16.8.7.apk (3.3 MB)
  5. VLk Text Editor (by "Dennis Volkov - VLK Apps")


    For the last entry, we have VLk Text Editor. Maybe this text editor is have the simplest features besides all text editor i said above. It looks this text editor application is more focus to being a notepad. Because the simplicity, cool user interface, notepad features, make VLk Text Editor the right choice for you who prefer only and just writing on your Android device without all the bullsh** :D . The app is available on the Playstore.

    vlk text editor android app screenshot

    Quoted from the developer
    Features:

    • Translated to English, Russian, Ukrainian
    • Notes
    • Material design
    • Save text file with any extension
    • Sending a text to SMS, E-mail, social. network ...
    • Multiple themes
    • Fine tuning interface
    • Advanced panel
    • Text search
    • Copy all text to clipboard
    • Support for multiple encodings
    ••• And much more!

    -> Download VLk Text Editor v. 1.8.5 (upd 3).apk (3.4 MB)

That's all the 5 Best text or code editor applications for Android devices, on my version. Basically it back to you to get the right text editor application on your Android device / smartphones that suits your daily life (or maybe not one of them :v ).